Automating Regression tests and Tuning Parameters with Artefacts
During the development of robotic systems, developers run a multitude of tests to develop new features and integrate components together. In this tutorial, we share how the Artefacts platform can make your robotics development more efficient via three common use cases illustrated with concrete examples:
- Regression tests: tests that run automatically and assert a pass/fail criteria. These tests ensure that new features don't break previously implemented ones
- Repeatability tests: running many tests with the same set of parameters to quantify non-deterministic behavior
- Tuning algorithm parameters: running many tests with different parameters to find the best set to optimize a metric
To provide a tutorial that is both relevant to robotics use cases but requires the least amount of code and zero setup we built a reference implementation with ROS1 and its simple turtlesim simulator.
All Artefacts related concepts showcased are generic beyond the ROS and the turtlesim example taken here. They are meant to serve as a reference and a recipe for your own use cases.
Each example below includes the test rationale + test description + test results, with clear guidance on how to use Artefacts to enable them. Special care is taken to keep the implementation specifics to a minimum in this tutorial but you are encouraged to browse the demonstration code that supports all the use cases covered at demo-ros1-turtlesim
Tutorial examples where chosen to provide a clear progression in terms of concept complexity, they are best followed in sequence. Prior familiarity with ROS1 and turtlesim is assumed.
1. Regression Tests
Rationale: Best practice for any complex system: define tests to ensure any already implemented capability is not degraded by subsequent implementations: regression tests.
Test Description: The key feature is that tests will be able to run automatically, from start to finish, and report pass/fail to the Artefacts Dashboard.
In this example, we define our regression test such that:
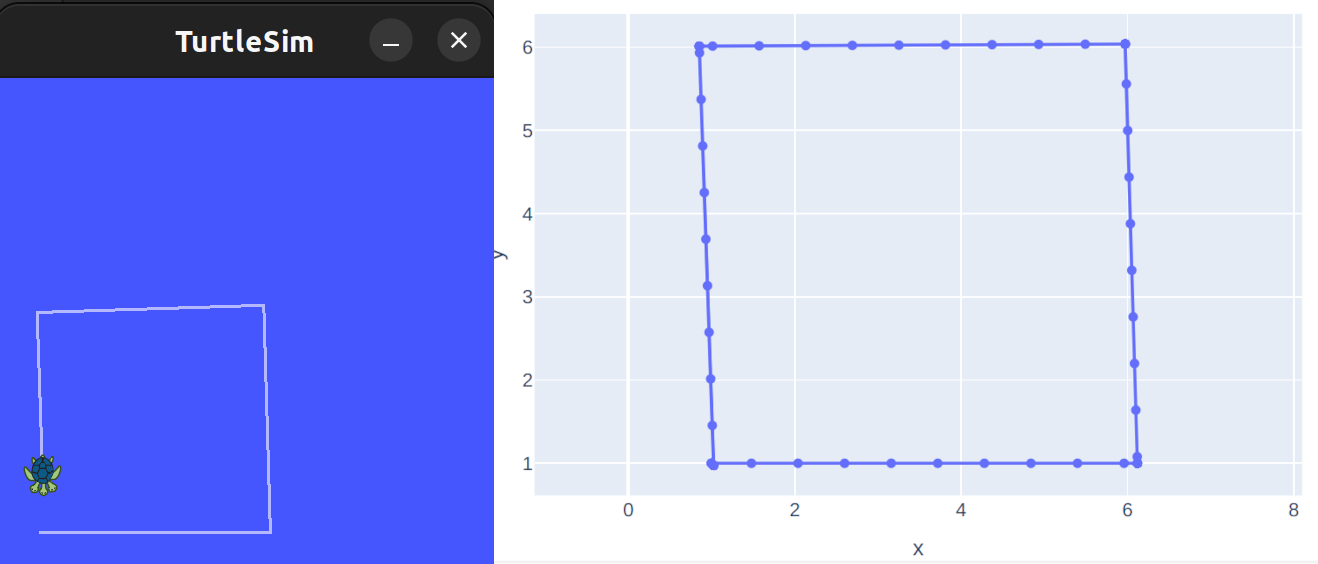
- the turtle is tasked to perform a square trajectory (4 equal-length straight traverses and 3 spot turns)
- success criteria: the final position of the turtle is near the start position (the loop trajectory is complete)
 Test setup:
Setting up rostest and Artefacts is straightforward:
- Write a
rostesttest class that- inherits from
unittest.TestCase - provides a
setUp()method that performs the test's “Arrange” functions. E.g to position the robot at the start and prepare any resources needed for the test - provides a
test_mytest()method that performs the test's “Act” (e.g send the commands to the turtle to execute the square loop trajectory) and the test's “Assert” functions (check the success criteria: that the loop trajectory is complete). - provides a
tearDown()method that performs any needed cleanup at the end of the test. - see the example test node source for the full details.
- inherits from
- Wrap this test node into a
.launchfilenode. Optionally, add any other nodes needed. See the example launch file - Make sure that these files are part of a ROS package, and that your ROS workspace is built and sourced.
- Write an
artefacts.yamlfile by following the configuration file syntax documentation. See the reference example. It can be as simple as:
project: demo-ros1-turtlesim
jobs:
  turtle_regression:
    type: test
    runtime:
      simulator: turtlesim
      framework: ros1:noetic
    scenarios:
      settings:
        - name: simple_regression_test
            ros_testpackage: turtle_simple
            ros_testfile: turtle_simple.launch
Then, executing this test can be done in any of three ways:
- locally for development/testing:
artefacts run rover_trajectory - remotely on the Artefacts infra:
artefacts run-remote rover_trajectory - best for CI use cases: automatically on the Artefacts infra, tests will run on every future push to the repo: (link the repository with the Artefacts Dashboard).
Take-away:
For regression type tests: these tests can be included in your Continuous Integration pipeline and ensure that any new development triggers an alert if it breaks features that were working previously.
More generally, this simple setup actually covers all the basics of using Artefacts and writing any kind of test:
- Every test follows the same Arrange/Act/Assert methodology. Here with ROS1 we used
rostestandunittest. Artefacts also supports ROS2 andlaunch_test(and any other framework) - By writing a simple YAML configuration file, Artefacts is able to pick up our test and automatically orchestrates the launching, logging and parsing of test results.
- Test results are also automatically uploaded to the Artefacts Dashboard where they can be viewed, compared and shared.
- a simple command allows the developer to choose whether to execute the test locally in the cloud, on Artefacts infra.
2. Repeatability Tests
A key feature of Artefacts is the ease of orchestrating many (many!) tests: in this example we will automatically execute 50 tests with just one additional concept in the YAML configuration file: a list of parameters.
We will also introduce how test metrics can be calculated automatically at the end of each test with a rosbag_postprocess script.
Rationale: Running 50 tests allows identifying and quantifying any non-deterministic aspects of the simulation or our test setup. This is called a repeatability test. Quantifying the variability of metrics when running tests with identical parameters allows concluding with the appropriate amount of confidence whether future implementations actually lead to an improvement / degradation in computed metrics (or if they are just the effect of statistical variation).
Test description:
We build this example on top of the previous turtlesim square trajectory.
To make this repeatability test more realistic, we add a node that creates a simulated wheel odometry sensor and computes the localization of the turtle from that (see turtle_odom.py). This is a stand-in relevant to any robotics application which may be fusing IMU and motor encoder data into a Kalman filter, or implementing SLAM, or any other localization framework.
For each test run, we will compute several metrics and check how they vary from run to run:
cumulative distance_final: total distance traveled by the turtle during the test (ground truth)error horizontal final: error, at the end of the trajectory, between the estimated x and y position of the turtle vs the ground truth (euclidean distance, in meters)error orientation final: error, at the end of the trajectory, between the estimated yaw (heading) orientation of the turtle vs the ground truth (absolute, in degrees)time delta max: maximum timestamp mis-match between each estimated and ground truth message. Low values ensure that error metrics are computed consistently.
Test Setup:
Using Artefacts, only a few additional steps are needed:
- write a post-processing script to compute the metrics. This script takes a rosbag as input and outputs a metrics.json file. Example turtle_post_process.py
- configure
artefacts.yamlto:- record the ROS topics needed into a rosbag: add the
rosbag_recordkey - run the post processing script at the end of each test: add the
rosbag_postprocesskey - automatically orchestrate running X number of tests and logging the data for each: under the
paramskey, add a dummy parameter with a list of X dummy values
- record the ROS topics needed into a rosbag: add the
See a reference example of theartefacts.yaml file. It can be as simple as:
project: demo-ros1-turtlesim
jobs:
  turtle_repeat:
    type: test
    runtime:
      simulator: turtlesim
      framework: ros1:noetic
    scenarios:
      settings:
        - name: turtle_repeatability
          ros_testpackage: turtle_odometry
          ros_testfile: test_odometry.launch
          rosbag_record: all
          rosbag_postprocess: turtle_post_process.py
          params:
            dummy: [0, 0, 0, 0, 0, 0, 0, 0, 0, 0]  # Artefacts will run 10 scenarios, each with the value from this parameter list
This test can then be run either locally (artefacts run turtle_repeatability) or on Artefacts infra. In both cases, Artefacts will automatically orchestrate running the 10 tests, one after the other. Then, results for each test are logged in the cloud on the Artefacts Dashboard.
The Artefact Dashboard displays every file created during the test, with rich visualization supported. In particular, html graphs (e.g. from plotly)
 From the Artefacts Dashboard, by clicking the grey arrow button, a CSV export of the results of all scenarios can be downloaded for further analysis.
Test Results:
A simple analysis (see example jupyter notebook) computes statistics and creates plots for each metric:
Due to the non-deterministic nature of the simulations, metrics from tests performed with the exact same conditions will still exhibit variations.
These variations are important to quantify to avoid reaching wrong conclusions in subsequent tests:
- any parameter tuning or algorithmic change that leads to a change in metrics within 1 standard deviation is probably neither an improvement nor a deterioration, just due to non-repeatability
- as part of a CI pipeline, the criteria for flagging regressions should be an interval, not a strict threshold. Example of the interval setting: median value +/- 3 sigma. (see next point too: for CI, running several tests and comparing the median result with the threshold value will be more robust to false positives and false negatives)
- outliers are possible: run your test a few times to confirm conclusions
Take-away
By simply specifying X parameters as a list in the YAML configuration file, Artefacts automatically runs X tests, and stores all the results in the Artefacts Dashboard.
By simply specifying a post_processing script, Artefacts can execute it at the end of each test and upload the resulting metrics to Artefact Dashboard for each test
Any file created during the test is uploaded, with rich visualization support. This allows interactive exploration of test results for greater insight.
3. Tuning Algorithm Parameters
Rationale:
Traditionally, parameter tuning in robotics is time consuming and error prone because:
- the parameter search space is large, requiring running many tests iteratively. Manually setting up each test, monitoring it and checking the results is tedious and time consuming.
- keeping track of test results and ensuring repeatable test conditions manually is tedious and error prone.
Artefacts provides a framework to specify each aspect of the test, parameterize it and perform a grid search across sets of parameters automatically while logging all results and displaying them in a central Dashboard.
Test description: We build this example on top of the previous turtlesim repeatability test.
This time, our goal is to actually improve the localization accuracy of the turtle. Precisely, to minimize two metrics: horizontal error final and orientation error final.
In this example, just two parameters can be tuned: odom_tuning_theta and odom_tuning_forward, they affect the odometry calculation using our mock sensor on the turtle.
Testing 10 values for each of these two parameters already leads to 100 combinations. This would be intractable with a traditional / manual test setup! But we can configure this easily with Artefacts then let the tests run during lunch and check the results on the Artefacts Dashboard afterwards.
Test setup:
Building upon the two test setups above, we just need to implement two additional elements:
- add a parameter interface between our codebase and Artefacts. At the beginning of each test, each parameter passed to
artefacts.yamlwill be made available on the ROSrosparamserver by Artefacts. Therefore we just need to add a few lines in our odometry node to check therosparamserver on startup: (rospy.get_param('test/odom_tuning_theta')). - add the parameters themselves to
artefacts.yamlas a list. They will serve as the basis for the automatic grid coverage implemented by Artefacts: every combination of parameters will trigger a test scenario (full example). For example, the .yaml below will create test scenarios!
project: demo-ros1-turtlesim
jobs:
  turtle_grid:
    type: test
    runtime:
      simulator: turtlesim
      framework: ros1:noetic
    scenarios:
      settings:
        - name: turtle_gridsearch
          ros_testpackage: turtle_odometry
          ros_testfile: turtle_odometry.launch
          rosbag_record: all
          rosbag_postprocess: turtle_post_process.py --skip_figures
          params:
            test/odom_tuning_theta: [0.001, 0.0025, 0.005, 0.01, 0.025, 0.05, 0.075, 0.1, 0.25, 0.5]
            test/odom_tuning_forward: [0.001, 0.0025, 0.005, 0.01, 0.025, 0.05, 0.075, 0.1, 0.25, 0.5]
Test Results:
After downloading the job results from the Artefacts Dashboard as a CSV, we can plot the two metrics of interest for each scenario (see jupyter notebook):
Here lower values are better and the goal is that both metrics are minimized jointly. To make comparing results across both metrics more practical, it is common practice to define a figure of merit :
where each is the weight assigned to each metric
These should be chosen according to the goals of the project (e.g. is it more important to minimize orientation error or the horizontal error?) Here we choose that 1 deg of orientation error is equivalent to 10 cm of horizontal error. We then plot the figure of merit for each of the 100 scenarios:
Plotting the figure of merit as a function of the parameters enables finding trends in the search. Here lower values of both parameters lead to a lower figure of merit, as seen in the figure below:
The parameters that lead to the highest localization accuracy are:
- odom_tuning_theta = 0.001
- odom_tuning_forward = 0.001
Take-away
In this example, after some one-time setup, we instructed Artefacts to run 100 tests with a single command. We could then export all computed metrics as a CSV and used this to identify the best set of parameters to tune the localization algorithm of the turtle. This methodology can be applied to tuning any type of algorithm that requires trying out many different parameter values.
Conclusion
This tutorial covered how to use Artefacts for common robotics development use cases:
- How to write tests with Artefacts and
rostestand then execute them automatically both locally and in the cloud on Artefacts infra. - How to instruct Artefacts to run a series of tests automatically and how to perform any post processing at the end of each test.
- How to tune an algorithm by instructing Artefacts to run tests with a range of parameters automatically and then downloading all results from the Artefacts Dashboard.