Artefacts ツールキット (ベータ版)
Artefacts ツールキットの使用方法
Artefacts ツールキットは常に開発中であり、新機能の追加や改善が行われています。定期的にご確認ください!
Artefacts ツールキットは、開発者の生産性を向上させるために設計された Python パッケージです。一般的なテストタスクを簡素化し、Artefacts プラットフォームと統合するヘルパー関数のコレクションを提供します。
ツールキットは以下のモジュールで構成されています:
インストール
pip install artefacts-toolkit
Note
Artefacts ツールキットは、Artefacts CLI、 artefacts.yaml、および Artefacts ダッシュボードと一緒に使用するように設計されています。一部の機能はそれらがなくても動作する場合がありますが、保証はできません。
Artefacts ツールキットを使用したサンプルプロジェクト:
- Nav2 - Nav2 ナビゲーションスタックと Gazebo を使用したサンプルプロジェクト。
1 - Artefacts ツールキットの設定ヘルパー
Artefacts ツールキットの設定ヘルパーは、 artefacts.yaml Artefacts ツールキットの設定ヘルパーは、
インポート方法:
from artefacts_toolkit.config import get_artefacts_param
関数
関数リファレンス
get_artefacts_param
artefacts.yaml ファイルで設定されたパラメータを返します。 param_type が launchに設定されている場合、ROS の起動引数として使用できるように string 型で返されます。
この関数はパラメトリックテストに特に役立ちます。 artefacts.yaml ファイルでパラメータ値のリストを定義すると(例:launch/world: ["empty.sdf", "bookstore.sdf", "restaurant.sdf"])、 artefacts run コマンドはリスト内の各値に対して1回ずつ、テストを複数回実行します。各テスト実行中、 get_artefacts_param("launch", "world") は自動的にその特定のテスト実行に対する現在のパラメータ値を返します。
これはグリッドベースのテストに特に強力です!それぞれ3つの可能な値を持つ3つのパラメータがある場合、Artefacts は自動的にテストを27回(3 × 3 × 3)実行しますが、起動ファイルのコードは変更されません。
get_artefacts_param(
    param_type,
    param_name,
    default=None,
    is_ros=True
)
パラメータ
| パラメータ |
型 |
説明 |
デフォルト |
param_type |
str |
パラメータの名前空間/カテゴリ(例:「launch/world」の「launch」) |
必須 |
param_name |
str |
T特定のパラメータ名(例:「launch/world」の「world」) |
必須 |
default |
any |
artefacts.yamlでパラメータが見つからない場合に返す値 |
None |
is_ros |
bool |
パラメータをROS パラメータ形式に変換するかどうか |
True |
戻り値
この関数は次の動作でパラメータ値を返します:
param_type が "launch" で is_ros が Trueの場合: artefacts.yaml ファイルの元の型に関係なく、値を strとして返します。これはROS起動引数として使用できるようにするためです。default がNone 以外に設定されている場合、artefacts が要求されたパラメータを見つけられない場合に値が返されます。これは(例えば) artefacts run の代わりに launch_test を使用しているがコード変更を行いたくない場合に便利です。また、 KeyError 例外を防ぎます。- その他のすべての場合:YAMLファイルの元の型(例:
list、 dict、 int、 float、 strなど)で値を返します。
Note
- 現在はROS パラメータ / ROS起動引数のみをサポートしています。
- パラメトリックテストは、artefactsをローカルで実行する場合、順次実行されます。プラットフォーム上で実行する場合、並行して実行されます(同時実行テストの最大数はサブスクリプションプランによって決まります)。
例
以下の設定が設定された artefacts.yaml ファイルがある場合:
scenarios:
  defaults:
    output_dirs: ["output"]
    metrics:
        - /odometry_error
    params:
      launch/world: ["bookstore.sdf", "empty.sdf"]
テスト起動ファイルでパラメータを次のように取得します:
def generate_test_description():
    try:
        world = get_artefacts_param("launch", "world")
    except FileNotFoundError:
        world = "empty.world"

    run_headless = LaunchConfiguration("run_headless")
    launch_navigation_stack = IncludeLaunchDescription(
        PythonLaunchDescriptionSource(
            [
                os.path.join(
                    get_package_share_directory("sam_bot_nav2_gz"),
                    "launch",
                    "complete_navigation.launch.py"
                ),
            ]
        ),
        launch_arguments=[("run_headless", run_headless), ("world_file", world)],
    )

...# Rest of launch test file
これにより、同じテストが2回実行されます - 1回は空のワールドで、1回は書店のワールドで - 実行間で起動ファイルのコードを変更することなく実行されます。
get_artefacts_params
指定された実行に対して artefacts.yaml で設定されたすべてのパラメータを読み込み、それらを dict として提供します。.get() などの通常の辞書メソッドと組み合わせて使用できます。
パラメータ
なし
戻り値
この関数は、指定された実行のすべてのパラメータを dict 型として返します。
Note
返される内容は、artefacts.yaml ファイルでテストファイルを指すために launch_test_file または run のどちらを使用しているかによって異なります。launch_test_file を使用している場合、パラメータは「ROS化」されますが、run を使用している場合はされません。例として:
scenarios:
  defaults:
    output_dirs: ["output"]
    metrics:
        - /odometry_error
    params:
      my_test_node/parameter_1: [0.1, 0.2]
      my_test_node/parameter_2: ["a", "b"]
launch_test_file を使用している場合、以下を返します:
# Run 1
{
    'my_test_node': {
        'ros__parameters': {
            'parameter_1': 0.1,
            'parameter_2': 'a'
        }
    }
}

# Run 2
{
    'my_test_node': {
        'ros__parameters': {
            'parameter_1': 0.2,
            'parameter_2': 'b'
        }
    }
}
run を使用している場合、以下を返します:
# Run 1
{
    'my_test_node/parameter_1': 0.1,
    'my_test_node/parameter_2': 'a'

}

# Run 2
{
    'my_test_node/parameter_1': 0.2,
    'my_test_node/parameter_2': 'b'

}
例
以下の設定が設定された artefacts.yaml ファイルがある場合:
scenarios:
    defaults:
        params:
            headless: "True"
ヘッドレスシミュレーション用の launch_description にフラグを次のように設定できます:
@launch_pytest.fixture(scope="module")
def launch_description(rosbag_recording):
    pkg_path = Path(get_package_share_directory("my_package"))
    try:
        headless = get_artefacts_params().get("headless", "False")
    except RuntimeError:
        # artefacts パラメータが利用できない場合、デフォルトで False に設定
        headless = "False"

    start_launch = IncludeLaunchDescription(
        PythonLaunchDescriptionSource(
            str(pkg_path / "launch" / "mytestfile.launch.py")
        ),
        launch_arguments={
            "headless": headless,
        }.items(),
    )
merge_ros_params_files
2つの ROS2 yaml パラメータファイルを1つにマージし、最初のファイル(source)の値を override の値で上書きします。
merge_ros_params_files(
    source,
    override,
    destination,
    rosify=False
)
パラメータ
| パラメータ |
型 |
説明 |
デフォルト |
source |
str |
上書き される 元のパラメータファイルへのパス |
必須 |
override |
str |
上書き する パラメータを含むパラメータファイルへのパス |
必須 |
destination |
str |
新しいパラメータファイルを保存する場所へのパス |
必須 |
rosify |
bool |
True の場合、パラメータを ros2 パラメータファイルのネスト形式に変換 |
False |
戻り値
None: 新しく作成されたマージ済みパラメータファイルは destination で指定されたパスで利用可能になります。
例
以下の source と override yaml ファイルがある場合:
# source
outer:
    inner1: 1
    inner2:
        leaf: keep
flat: src

# override
outer:
    inner2:
        leaf: replaced
        new_leaf: 321
    inner3: added
flat: override
以下のような新しい yaml ファイルが destination に保存されます:
# rosify=False (デフォルト)
outer:
    inner1: 1
    inner2:
        leaf: replaced
        new_leaf: 321
    inner3: added
flat: override
rosify=True の場合、パラメータは適切なノードの ros__parameters の下にネストされます:
#source
controller_server:
    ros__parameters:
        enable_stamped_cmd_vel: true
        controller_frequency: 20.0
        min_x_velocity_threshold: 0.001

#override
controller_server/controller_frequency: 30
controller_server/min_x_velocity_threshold: 0.005
controller_server/min_y_velocity_threshold: 0.5

#destination
controller_server:
    ros__parameters:
        enable_stamped_cmd_vel: true
        controller_frequency: 30
        min_x_velocity_threshold: 0.005
        min_y_velocity_threshold: 0.5
2 - Artefacts ツールキットのチャートヘルパー
Artefacts ツールキットのチャートヘルパーは、テスト実行中にトピックから受信したデータを可視化するのに役立つように設計されています。
インポート方法:
from artefacts_toolkit.chart import make_chart
関数
関数リファレンス
make_chart
2つの提供されたトピックからのデータに基づいてインタラクティブなHTMLチャートを作成します。
make_chart(
    filepath,
    topic_x,
    topic_y,
    field_unit=None,
    output_dir="output",
    chart_name="chart",
    file_type="rosbag",
    output_format="html"
)
Parameters
| パラメータ |
型 |
説明 |
デフォルト |
filepath |
str |
データファイル(rosbag)へのパス |
必須 |
topic_x |
str |
x軸のトピック名。時間に対してプロットする場合は “Time” を使用 |
必須 |
topic_y |
str |
y軸のトピック名。時間に対してプロットする場合は “Time” を使用 |
必須 |
field_unit |
str |
フィールドデータの測定単位(例:「m/s」、「rad」) |
None |
output_dir |
str |
チャートが保存されるディレクトリ |
"output" |
chart_name |
str |
生成されるチャートファイルの名前 |
"chart" |
file_type |
str |
データファイルのタイプ。現在は “rosbag” をサポート |
"rosbag" |
output_format |
str |
出力ファイルタイプ。“html” または “csv” から選択してください |
"html" |
戻り値
None:
output_format="html" の場合 : output_dir に plotly html チャート <chart_name>.html を作成しますが、値は返しません。output_format="csv" の場合 : output_dir に csv ファイル <chart_name>.csv を作成しますが、値は返しません。ダッシュボードはアップロード時に csv ファイルを自動的にチャートに変換しようとします。ファイルサイズを小さく保ちたい場合に便利です。
Note
- 現在、rosbag からのチャート作成のみをサポートしています。
- “Time” をトピックの1つとして使用する場合、関数は可能であれば他のトピックをそのトピックのタイムスタンプに対してプロットします。トピックのメッセージ構造にタイムスタンプがない場合は、rosbag の時間が使用されます。
例
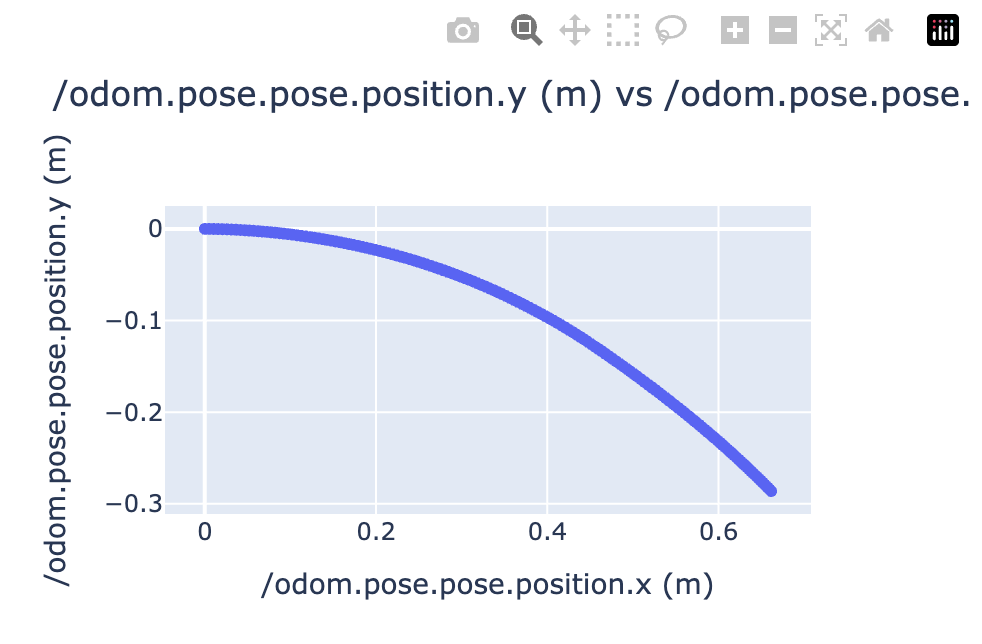
以下の例では、テストが完了し rosbag が保存された後、すなわちシャットダウン後に make_chart 関数を追加しています。
# my_test_file.launch.py
# test code

...

@launch_testing.post_shutdown_test()
class TestProcOutputAfterShutdown(unittest.TestCase):
    def test_exit_code(self, rosbag_filepath):
        make_chart(
            rosbag_filepath,
            "/odom.pose.pose.position.x",
            "/odom.pose.pose.position.y",
            field_unit="m",
            chart_name="odometry_position",
        )
以下のようなチャートが生成されます:
3 - Artefacts ツールキットの Gazebo ヘルパー
Artefacts ツールキットの Gazebo ヘルパーは、テスト実行中に Gazebo シミュレーションとやり取りするための便利な関数を提供します。これらのユーティリティを使用すると、シミュレーションオブジェクトの検査、モデル位置へのアクセス、および Gazebo と ROS2 間のトピックブリッジングが可能になります。
インポート方法:
from artefacts_toolkit.gazebo import bridge, gz
関数
関数リファレンス
bridge.get_camera_bridge
カメラトピック用の gazebo / ros2 トピックブリッジを作成します。
bridge.get_camera_bridge(
    topic_name,
    condition=None
)
パラメータ
| パラメータ |
型 |
説明 |
デフォルト |
topic_name |
str |
Gazebo から ROS2 へブリッジするカメラトピック名 |
必須 |
condition |
str |
このブリッジを作成するタイミングを決定するオプションの起動条件 |
None |
戻り値
Node:指定されたカメラトピックの parameter_bridge を実行する ROS 2 Node オブジェクトを返します。このノードは起動記述に含めることができます。
Note
- このブリッジは、Gazebo の画像メッセージ (gz.msgs.Image) と ROS 2 の画像メッセージ (sensor_msgs/msg/Image) 間を変換します。
- 環境に ros_gz_bridge パッケージがインストールされている必要があります。
例
次の例では、起動引数に基づいて条件付きで作成されるカメラブリッジを示しています。record_video が “true” に設定されている場合、ブリッジが有効になり、ROS 2 ノードが Gazebo からのカメラ画像をサブスクライブできるようになります。返された Node は、起動プロセスに含めるために LaunchDescription に追加されます。
@pytest.mark.launch_test
def generate_test_description():
    from artefacts_toolkit.gazebo import bridge
    ...

    camera_topic = "/observation_camera/image"
    bag_recorder, rosbag_filepath = get_bag_recorder([camera_topic])
    sim = IncludeLaunchDescription(
        PythonLaunchDescriptionSource(["bringup", "/robot.launch.py"])
    )

    record_video_launch_arg = DeclareLaunchArgument(
        "record_video", default_value="true"
    )
    record_video = LaunchConfiguration("record_video")
    camera_bridge = bridge.get_camera_bridge(camera_topic, condition=IfCondition(record_video))

    return LaunchDescription(
        [
            record_video_launch_arg,
            sim,
            camera_bridge,
            controller_process,
            launch_testing.actions.ReadyToTest(),
        ]
    )
gz.get_sim_objects
XML 構造を解析することで Gazebo ワールドファイルからモデル情報を抽出します。この関数は、ワールドファイルで定義されているすべてのモデルの名前と元のポーズを返します。
これは、実行中のシミュレーションに問い合わせる(物理、ランダム性、または相互作用によって位置が変わっている可能性がある)よりも、ワールドファイルで定義されているモデルの初期ポーズを知る必要がある場合に便利です。
gz.get_sim_objects(world_file)
パラメータ
| パラメータ |
型 |
説明 |
デフォルト |
world_file |
str |
解析する Gazebo ワールドファイルへのパス |
必須 |
戻り値
tuple: この関数は、アンパックする必要がある2つの値を持つタプルを返します:
objects = [
    {
        "name": "model_1",
        "pose": "0 0 0 0 0 0"
    },
    {
        "name": "model_2",
        "pose": "1 2 3 0 0 0"
    },
    ...
]
objects_positions = {
    "model_1": "0 0 0 0 0 0",
    "model_2": "1 2 3 0 0 0",
    ...
}
例
# Working with the objects_position dict
_, objects_positions = gz.get_sim_objects("world.sdf")
model_pose = objects_positions["model_1"]  # "0 0 0 0 0 0"

# Working with the objects list
objects, _ = gz.get_sim_objects("world.sdf")
for model in objects:
    print(f"{model['name']} is at position {model['pose']}")
gz.get_model_location
実行中の Gazebo シミュレーションでのモデルの現在の (x, y, z) 位置を取得します。ワールドファイルから元の位置を読み取る get_sim_objects とは異なり、この関数はライブシミュレーションに問い合わせてモデルの現在の位置を取得します。
gz.get_model_location(model_name)
パラメータ
| パラメータ |
型 |
説明 |
デフォルト |
model_name |
str |
シミュレーションで問い合わせるモデルの名前 |
必須 |
戻り値
tuple:メートル単位の (x, y, z) 位置を表す3つの浮動小数点値のタプルを返します:
(x_position, y_position, z_position)
Note
- この関数には Gazebo シミュレーションが実行中である必要があります。
- モデル位置を特定できない場合は (0.0, 0.0, 0.0) を返します。
例
以下の例は、ピック&プレースタスクを検証するために get_sim_objects と get_model_location を組み合わせる方法を示しています。次の方法を示しています:
- ワールドファイルから初期位置を取得する
- ロボットがタスクを完了するのを待つ
- 初期位置と現在の位置を比較して、どのオブジェクトが移動したかを検出する
class TestProcOutput(unittest.TestCase):
    def test_moved_meatballs(self, proc_output, controller_process):
        # Original locations
        sim_objects, sim_objects_positions = gz.get_sim_objects("worlds/env.sdf") # this includes models poses
        meatball_models = [obj["name"] for obj in sim_objects if "karaage" in obj["name"]]
        #  Wait for the control loop to finish
        proc_output.assertWaitFor("Done with tasks execution", timeout=300)
        picked_meatballs = 0 # karaage moved for more than 10cm
        for meatball in meatball_models:
            x, y, z = gz.get_model_location(meatball)
            x_original, y_original, z_original = sim_objects_positions[meatball]
            dist = ((x - x_original) ** 2 + (y - y_original) ** 2 + (z - z_original) ** 2) ** 0.5
            if dist > 0.1: #10cm
                # Likely to have been picked and moved somewhere else
                picked_meatballs += 1
        self.assertEqual(picked_meatballs, 4)
gz.kill_gazebo
現在実行中の gazebo プロセスを強制終了します。
戻り値
None: この関数は値を返しません。
例
from artefacts_toolkit.gazebo import gz
...

@launch_testing.post_shutdown_test()
class TestProcOutputAfterShutdown(unittest.TestCase):
    def test_exit_code(self, proc_info, controller_process, rosbag_filepath):
        gz.kill_gazebo()
        ...
gz.make_actor
シミュレーションにアクターを追加するために必要な XML を作成します。提供されたウェイポイント、歩行速度、回転速度に基づいて、アクターが移動するパスが作成されます。
gz.make_actor(
    actor_name,
    waypoints,
    walk_speed=0.8,
    rotate_speed=1.8,
    enable_loop=True
)
パラメータ
| パラメータ |
型 |
説明 |
デフォルト |
actor_name |
str |
アクターの名前。XML では <actor name="{actor_name}"> として記述されます |
必須 |
waypoints |
list |
ウェイポイント座標のリスト。位置のみの場合は [[x,y,z], ...]、位置と回転の場合は [[x,y,z,roll,pitch,yaw], ...] |
必須 |
walk_speed |
float |
アクターの歩行速度(メートル/秒) |
0.8 |
rotate_speed |
float |
アクターの回転速度(ラジアン/秒) |
1.8 |
enable_loop |
bool |
アクターがウェイポイントパスを継続的に繰り返すかどうか |
True |
戻り値
str: Gazebo アクターの XML 文字列表現を返します:
<actor name="{actor_name}">
    <skin>
        <filename>https://fuel.gazebosim.org/1.0/Mingfei/models/actor/tip/files/meshes/walk.dae</filename>
    </skin>

    <animation name="walking">
        <filename>https://fuel.gazebosim.org/1.0/Mingfei/models/actor/tip/files/meshes/walk.dae</filename>
        <interpolate_x>true</interpolate_x>
    </animation>

    <script>
        <loop>true / false</loop>
        <delay_start>0.0</delay_start>
        <auto_start>true</auto_start>

        <trajectory id="0" type="walking">
            # 提供された入力に基づいて生成されたウェイポイント
        </trajectory>
    </script>
</actor>
例
以下のウェイポイントが与えられた場合:
waypoints = [
    [4, -3.2, 1.0],
    [0.8, -3.2, 1.0],
    [0.8, -6, 1.0],
    [4, -6, 1.0],
]
actor_xml = gz.make_actor("my_actor", waypoints, walk_speed=0.8, rotate_speed=1.8, enable_loop=True)
これは以下のXMLを返します:
<actor name="my_actor">
    <skin>
        <filename>https://fuel.gazebosim.org/1.0/Mingfei/models/actor/tip/files/meshes/walk.dae</filename>
    </skin>

    <animation name="walking">
        <filename>https://fuel.gazebosim.org/1.0/Mingfei/models/actor/tip/files/meshes/walk.dae</filename>
        <interpolate_x>true</interpolate_x>
    </animation>

    <script>
        <loop>true</loop>
        <delay_start>0.0</delay_start>
        <auto_start>true</auto_start>

        <trajectory id="0" type="walking">
            <waypoint>
                <time>0</time>
                <pose>4 -3.2 1.0 0 0 3.141592653589793</pose>
            </waypoint>
            <waypoint>
                <time>4.0</time>
                <pose>0.8 -3.2 1.0 0 0 3.141592653589793</pose>
            </waypoint>
            <waypoint>
                <time>6.617993877991495</time>
                <pose>0.8 -3.2 1.0 0 0 -1.5707963267948966</pose>
            </waypoint>
            <waypoint>
                <time>10.117993877991495</time>
                <pose>0.8 -6 1.0 0 0 -1.5707963267948966</pose>
            </waypoint>
            <waypoint>
                <time>10.99065850398866</time>
                <pose>0.8 -6 1.0 0 0 0.0</pose>
            </waypoint>
            <waypoint>
                <time>14.99065850398866</time>
                <pose>4 -6 1.0 0 0 0.0</pose>
            </waypoint>
            <waypoint>
                <time>15.863323129985826</time>
                <pose>4 -6 1.0 0 0 1.5707963267948966</pose>
            </waypoint>
            <waypoint>
                <time>19.363323129985826</time>
                <pose>4 -3.2 1.0 0 0 1.5707963267948966</pose>
            </waypoint>
            <waypoint>
                <time>20.23598775598299</time>
                <pose>4 -3.2 1.0 0 0 3.141592653589793</pose>
            </waypoint>

        </trajectory>
    </script>
</actor>
4 - Artefacts ツールキットの Rosbag ヘルパー
Artefacts ツールキットの Rosbag ヘルパーは、テスト実行中に ROS バッグファイルを作成、記録、およびデータを抽出するための便利な関数を提供します。これらのユーティリティは、分析と可視化のために処理されるトピックデータをキャプチャするのに役立ちます。
インポート方法:
from artefacts_toolkit.rosbag import get_bag_recorder, image_topics, message_topics
関数
関数リファレンス
get_bag_recorder
指定されたトピック名のリストに対する rosbag2 レコーダーを作成し、ノードとファイルパスを返します。
rosbag.get_bag_recorder(
    topic_names,
    directory="rosbags",
    use_sim_time=False
)
パラメータ
| パラメータ |
型 |
説明 |
デフォルト |
topic_names |
list[str] |
記録する ROS トピックのリスト |
必須 |
directory |
str |
rosbag が保存されるディレクトリ |
"rosbags" |
use_sim_time |
bool |
システム時間の代わりにシミュレーション時間を使用するかどうか |
False |
戻り値
tuple: 以下を含むタプルを返します:
bag_recorder(ExecuteProcess): レコーダープロセスを実行する Launch Action。rosbag_filepath(str): 作成される rosbag ファイルへのパス。
Note
- ファイル形式は MCAP です。
- Rosbag ファイルは自動的に
"rosbag2_" + yyyymmddhhmmss形式のタイムスタンプで名前が付けられます。
- The
bag_recorder プロセスは LaunchDescription に追加する必要があります。
artefacts runを使用する際に --no upload フラグを使用しない限り、rosbag は自動的に artefacts ダッシュボードにアップロードされます。
例
以下の例では、 bag_recorder ヘルパーを使用して rosbag を記録し、 bag_recorder を起動記述に追加し、後で rosbag_filepath をアサーションテスト(別の rosbag ヘルパー get_final_messageを使用)に使用するテスト起動ファイルを示しています:
@pytest.mark.launch_test
def generate_test_description():
    camera_topics = ["/depth_cam/rgb"]
    extra_topics = ["/odom", "/noisy_estimate"]

    bag_recorder, rosbag_filepath = rosbag.get_bag_recorder(
        camera_topics + extra_topics, use_sim_time=False
    )

    test_odometry_node = ExecuteProcess(
        cmd=[
            "python3",
            "src/test_odometry_node.py",
        ]
    )
    return LaunchDescription(
        [
            test_odometry_node,
            launch_testing.actions.ReadyToTest(),
            bag_recorder,
        ]
    ), {
        "test_odometry_node": test_odometry_node,
        "rosbag_filepath": rosbag_filepath,
    }


@launch_testing.post_shutdown_test()
class TestProcOutputAfterShutdown(unittest.TestCase):
    def test_end_position(self, rosbag_filepath):
        final_distance_from_start = message_topics.get_final_message(
            rosbag_filepath, "/distance_from_start.data"
        )

        assert final_distance_from_start < 0.1, (
            f"Final distance from start is {final_distance_from_start}, expected less than 10cm"
        )
提供されたカメラトピックから最後に記録された画像を返します。
image_topics.extract_camera_image(
    rosbag_file_path,
    camera_topic,
    output_dir="output"
)
パラメータ
| パラメータ |
型 |
説明 |
デフォルト |
rosbag_file_path |
str |
記録された rosbag へのパス |
必須 |
camera_topic |
str |
画像を取得する ROS カメラトピックの名前 |
必須 |
output_dir |
str |
抽出された画像を保存するディレクトリ |
"output" |
戻り値
None: 画像で指定された output_dir に保存されます。
Note
- 画像は
.png 形式で保存されます。
output_dir を artefacts.yaml ファイルの output_dirs と同じディレクトリに設定することで、テスト終了後に画像が自動的に artefacts ダッシュボードにアップロードされます。
例
以下の例では、テスト終了後に rosbag から最後のカメラ画像を抽出する方法を示しています。 rosbag.get_rosbag_recorder 関数によって返された rosbag_filepath を使用します。
from artefacts_toolkit.rosbag import rosbag, image_topics
def test_exit_code(
    self, proc_info, test_odometry_node, rosbag_filepath
):
    ...

    image_topics.extract_camera_image(rosbag_filepath, "/depth_cam/rgb")
提供されたカメラトピックからすべての画像を組み合わせて WebM ビデオを作成します。
image_topics.extract_video(
    bag_path,
    topic_name,
    output_path,
    frame_rate=20
)
パラメータ
| パラメータ |
型 |
説明 |
デフォルト |
bag_path |
str |
記録された rosbag へのパス |
必須 |
topic_name |
str |
ビデオを作成する ROS カメラトピックの名前 |
必須 |
output_path |
str |
ビデオが保存されるパス (.webm) |
必須 |
frame_rate |
int |
作成されるビデオに使用するフレームレート |
20 |
戻り値
None: ビデオファイルは指定された output_path に保存されます。
注意
Note
- ビデオは WebM 形式で保存されます。
output_path に存在しない場合は自動的に設定されます。
- artefacts.yaml ファイルの
output_dirs で指定されたディレクトリに保存することで、ビデオは自動的に artefacts ダッシュボードにアップロードされます。
例
以下の例では、テスト終了後に rosbag からビデオを抽出する方法を示していますrosbag.get_rosbag_recorder 関数によって返された rosbag_filepath を使用します。
from artefacts_toolkit.rosbag import rosbag, image_topics
def test_exit_code(
    self, proc_info, test_odometry_node, rosbag_filepath
):
    ...

    image_topics.extract_video(rosbag_filepath, "/depth_cam/rgb", "output/depth_cam.webm")
message_topics.get_final_message
rosbag 内の指定されたトピックから最終メッセージを取得します。オプションでドット表記を使用した属性アクセスが可能です。
message_topics.get_final_message(
    rosbag_filepath,
    topic
)
パラメータ
| パラメータ |
型 |
説明 |
デフォルト |
rosbag_filepath |
str |
記録された rosbag へのパス |
必須 |
topic |
str |
トピック名。ドット表記を使用してメッセージ属性を掘り下げます(例:"/distance.data") |
必須 |
戻り値
Any: 指定されたメッセージ属性の値を返します。型はアクセスされるフィールドによって異なります。
Note
- ドット表記を使用した属性アクセスをサポートしています(例:"/distance.data")
例
rosbag.get_bag_recorder の説明と同じ例を使用します。アサーションテストを行うために distance_from_start トピックからデータを取得していることに注目してください。
@launch_testing.post_shutdown_test()
class TestProcOutputAfterShutdown(unittest.TestCase):
    def test_end_position(self, rosbag_filepath):
        final_distance_from_start = message_topics.get_final_message(
            rosbag_filepath, "/distance_from_start.data"
        )

        assert final_distance_from_start < 0.1, (
            f"Final distance from start is {final_distance_from_start}, expected less than 10cm"
        )