This is the multi-page printable view of this section.
Click here to print.
Return to the regular view of this page.
The Artefacts Toolkit (beta)
Using the Artefacts Toolkit
The Artefacts Toolkit is under constant development, improving and adding new features. Please check back often!
The Artefacts Toolkit is a Python package designed to improve developer productivity. It provides a collection of helper functions that simplify common testing tasks and integrate with the Artefacts platform.
The toolkit is organized into the following modules:
- Configuration Helpers - Simplify parametric testing and bring in configurations from the
artefacts.yaml file
- Chart Helpers - Generate visualisations from test data
- Gazebo Helpers - Interact with Gazebo simulations during tests
- Rosbag Helpers - Record, extract, and analyze data from ROS bag files
- Rerun Helpers - Record Rerun
.rrd files during simulation and make test assertions against them
- Navigation Helpers - Record a route in RViz, spawn the robot at its start, drive it through Nav2 and assert on the result
Installation
pip install artefacts-toolkit
Note
The Artefacts Toolkit is designed to be used together with the Artefacts CLI, artefacts.yaml, and the Artefacts Dashboard. Some functions may work without it, but cannot be guaranteed.
- Nav2 - An example project using the Nav2 navigation stack and Gazebo.
1 - Configuration Helpers in the Artefacts Toolkit
The Artefacts Toolkit Configuration Helpers are functions that allow you to interact with configurations you have set in your artefacts.yaml file.
Import with:
from artefacts_toolkit.config import get_artefacts_param
Functions
Function Reference
get_artefacts_param
Returns a parameter set in the artefacts.yaml file. If param_type is set to launch, it will be returned as type string so that it can be used as a ROS launch argument.
This function is particularly useful for parametric testing. When you define a list of parameter values in your artefacts.yaml file (e.g., launch/world: ["empty.sdf", "bookstore.sdf", "restaurant.sdf"]), the artefacts run command will execute your test multiple times - once for each value in the list. During each test execution, get_artefacts_param("launch", "world") will automatically return the current parameter value for that specific test run.
This becomes especially powerful for grid-based testing! With three parameters that each have three possible values, Artefacts will automatically execute your test 27 times (3 × 3 × 3) while your launch file code remains unchanged.
get_artefacts_param(
    param_type,
    param_name,
    default=None,
    is_ros=True
)
Parameters
| Parameter |
Type |
Description |
Default |
param_type |
str |
The namespace/category of the parameter (e.g., “launch” in “launch/world”) |
Required |
param_name |
str |
The specific parameter name (e.g., “world” in “launch/world”) |
Required |
default |
any |
Value to return if the parameter isn’t found in artefacts.yaml. |
None |
is_ros |
bool |
Whether the parameter should be converted to a ROS parameter format |
True |
Returns
The function returns the parameter value with the following behavior:
- If
param_type is "launch" and is_ros is True: Returns the value as a str, regardless of its original type in the artefacts.yaml file. This is so that it can be used as a ros launch argument.
- if
default is set to anything other than None, then the value will be returned if artefacts is unable to find the requested parameter. This can be useful when (for example) using launch_test instead of artefacts run but you do not wish to make any code changes. It will also prevent KeyError exceptions.
- For all other cases: Returns the value with its original type from the YAML file (e.g.,
list, dict, int, float, str, etc.)
Note
- Currently only supports ROS Params / ROS launch arguments.
- Parametric tests will execute sequentially when running artefacts locally. When running on the platform, they will run in parallel (the maximum number of concurrent tests is determined by your subscription plan).
Example
Given an artefacts.yaml file with the following configuration set:
scenarios:
  defaults:
    output_dirs: ["output"]
    metrics:
        - /odometry_error
    params:
      launch/world: ["bookstore.sdf", "empty.sdf"]
Getting the parameter in our test launch file like so:
def generate_test_description():
    try:
        world = get_artefacts_param("launch", "world")
    except FileNotFoundError:
        world = "empty.world"

    run_headless = LaunchConfiguration("run_headless")
    launch_navigation_stack = IncludeLaunchDescription(
        PythonLaunchDescriptionSource(
            [
                os.path.join(
                    get_package_share_directory("sam_bot_nav2_gz"),
                    "launch",
                    "complete_navigation.launch.py"
                ),
            ]
        ),
        launch_arguments=[("run_headless", run_headless), ("world_file", world)],
    )

...# Rest of launch test file
This will run the same test twice - once in an empty world and once in a bookstore world - without any changes to your launch file code between runs.
get_artefacts_params
Loads all parameters set in artefacts.yaml for a given run, providing them as dict. Can be used with regular dict methods such as .get()
Parameters
None
Returns
The function returns all parameters for a given run as type dict.
Note
What is returned will differ depending on whether you are using launch_test_file not in your artefacts.yaml file to point to your test file. With launch_test_file the parameters will be “rosified”, otherwise (e.g with pytest_file, run) they will not. As an example:
scenarios:
  defaults:
    output_dirs: ["output"]
    metrics:
        - /odometry_error
    params:
      my_test_node/parameter_1: [0.1, 0.2]
      my_test_node/parameter_2: ["a", "b"]
will return the following when using launch_test_file:
# Run 1
{
    'my_test_node': {
        'ros__parameters': {
            'parameter_1': 0.1,
            'parameter_2': 'a'
        }
    }
}

# Run 2
{
    'my_test_node': {
        'ros__parameters': {
            'parameter_1': 0.2,
            'parameter_2': 'b'
        }
    }
}
and the following when using pytest_file:
# Run 1
{
    'my_test_node/parameter_1': 0.1,
    'my_test_node/parameter_2': 'a'

}

# Run 2
{
    'my_test_node/parameter_1': 0.2,
    'my_test_node/parameter_2': 'b'

}
Example
Given an artefacts.yaml file with the following configuration set:
scenarios:
    defaults:
        params:
            headless: "True"
We can set a flag on our launch_description for a headless simulation as follows:
@launch_pytest.fixture(scope="module")
def launch_description(rosbag_recording):
    pkg_path = Path(get_package_share_directory("my_package"))
    try:
        headless = get_artefacts_params().get("headless", "False")
    except RuntimeError:
        # If artefacts params are not available, default to False
        headless = "False"

    start_launch = IncludeLaunchDescription(
        PythonLaunchDescriptionSource(
            str(pkg_path / "launch" / "mytestfile.launch.py")
        ),
        launch_arguments={
            "headless": headless,
        }.items(),
    )
merge_ros_params_files
Merges two ROS2 yaml parameter files into one, overriding the values in the first one (source) with the values in override
merge_ros_params_files(
    source,
    override,
    destination,
    rosify=False
)
Parameters
| Parameter |
Type |
Description |
Default |
source |
str |
Path to original parameter file to be overridden |
Required |
override |
str |
Path to parameter file containing parameters to override |
Required |
destination |
str |
Path to where new parameter file should be saved |
Required |
rosify |
bool |
Converts params to ros2 param file nested format if True |
False |
Returns
None: The newly made merged parameter file will be available at the path specified in destination
Example
Given the following source and override yaml:
# source
outer:
    inner1: 1
    inner2:
        leaf: keep
flat: src

# override
outer:
    inner2:
        leaf: replaced
        new_leaf: 321
    inner3: added
flat: override
We will get the following new yaml file saved to destination as follows:
# rosify=False (Default)
outer:
    inner1: 1
    inner2:
        leaf: replaced
        new_leaf: 321
    inner3: added
flat: override
With rosify=True, parameters will be nested under ros__parameters for the appropriate node:
#source
controller_server:
    ros__parameters:
        enable_stamped_cmd_vel: true
        controller_frequency: 20.0
        min_x_velocity_threshold: 0.001

#override
controller_server/controller_frequency: 30
controller_server/min_x_velocity_threshold: 0.005
controller_server/min_y_velocity_threshold: 0.5

#destination
controller_server:
    ros__parameters:
        enable_stamped_cmd_vel: true
        controller_frequency: 30
        min_x_velocity_threshold: 0.005
        min_y_velocity_threshold: 0.5
2 - Chart Helpers in the Artefacts Toolkit
The Artefacts Toolkit Chart helpers are designed to help you with visualising data received from topics while running tests.
Import with:
from artefacts_toolkit.chart import make_chart
Functions
Function Reference
make_chart
Creates an interactive HTML chart based on data from two provided topics.
make_chart(
    filepath,
    topic_x,
    topic_y,
    axis_x_name="",
    axis_y_name="",
    field_unit=None,
    output_dir="output",
    chart_name="chart",
    file_type="rosbag"
    output_format="html"
)
Parameters
| Parameter |
Type |
Description |
Default |
filepath |
str |
Path to the data file (rosbag) |
Required |
topic_x |
Union[str, list] |
Topic name for x-axis. Use “Time” to plot against time |
Required |
topic_y |
Union[str, list] |
Topic name for y-axis. Use “Time” to plot against time |
Required |
axis_x_name |
str |
Label for x-axis. Auto-generated for single topics; recommended when using a list of topics |
"" |
axis_y_name |
str |
Label for y-axis. Auto-generated for single topics; recommended when using a list of topics |
"" |
field_unit |
str |
Unit of measurement for the field data (e.g., “m/s”, “rad”) |
None |
output_dir |
str |
Directory where the chart will be saved |
"output" |
chart_name |
str |
Name of the generated chart file |
"chart" |
file_type |
str |
Type of data file. Currently supports “rosbag” |
"rosbag" |
output_format |
str |
Output file type. Choose from “html” or “csv” |
"html" |
Returns
None:
- Creates a plotly html chart
<chart_name>.html at output_dir but doesn’t return any value.
- Can create single, or multiple plot charts (See Example)
- Creates a csv file
<chart_name>.csv at output_dir but doesn’t return any value. The Dashboard will automatically try to convert csv files to charts upon upload. Useful when wanting to keep file sizes down.
- Please note that the dashboard can only currently automatically create single topic charts.
Note
- Currently only supports creating charts from rosbags
- When using “Time” as one of the topics, the function will automatically plot the other topic against that topic’s timestamp if available. If the topic does not have timestamps in its message structure, the rosbag’s time will be used.
Example
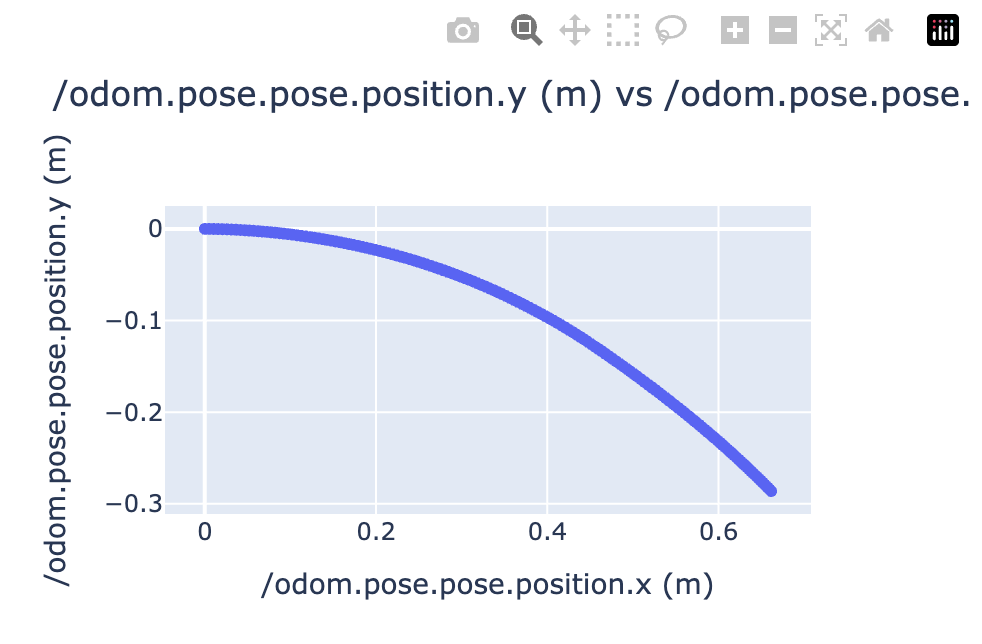
Single Topics
The following example adds the make_chart function post shutdown, i.e after the test has completed and rosbag saved.
# my_test_file.launch.py
# test code

...

@launch_testing.post_shutdown_test()
class TestProcOutputAfterShutdown(unittest.TestCase):
    def test_exit_code(self, rosbag_filepath):
        make_chart(
            rosbag_filepath,
            "/odom.pose.pose.position.x",
            "/odom.pose.pose.position.y",
            field_unit="m",
            chart_name="odometry_position",
            output_format="csv"
        )
Producing a csv file that will automatically display as a chart in the dashboard as below:
Topic vs Topics
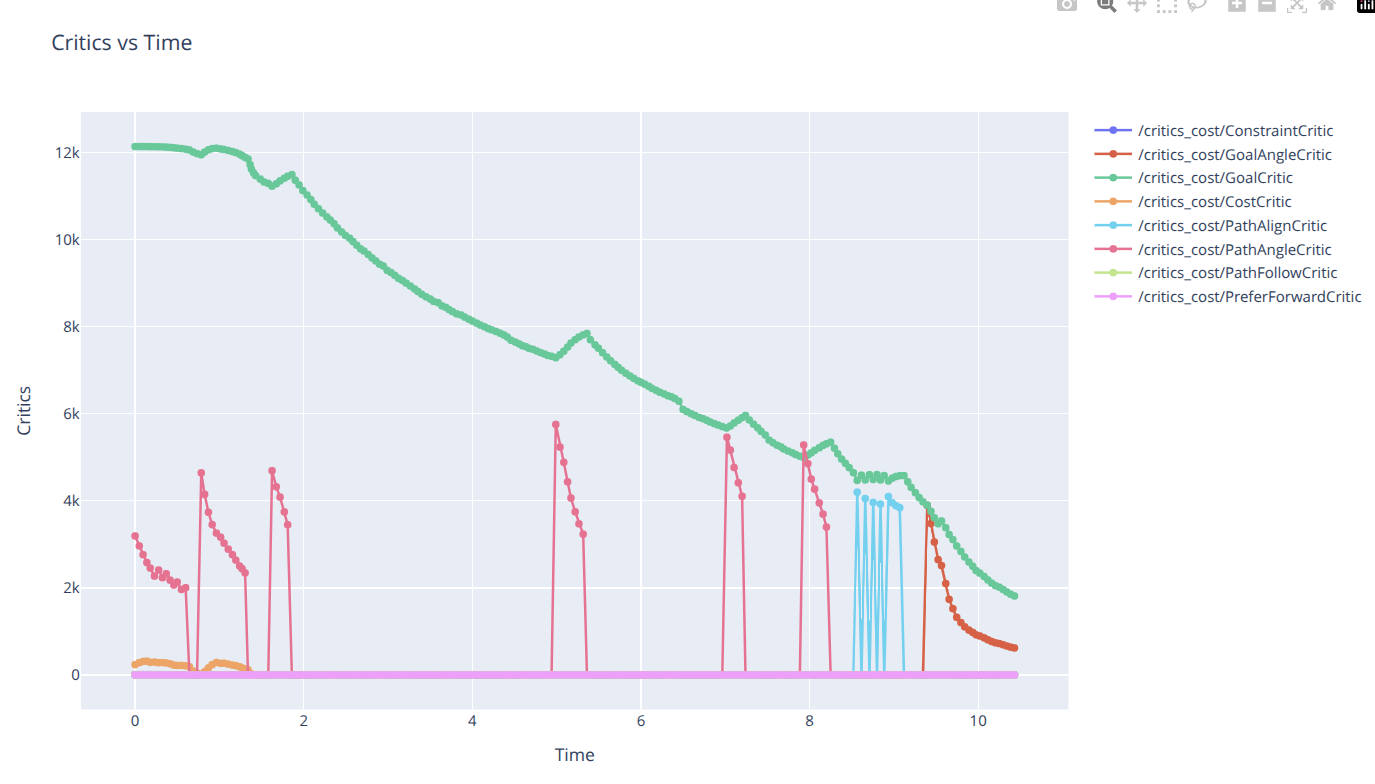
make_chart(
    rosbag_filepath,
    "time",
    ["/critics_cost/ConstraintCritic.data", "/critics_cost/GoalAngleCritic.data", "/critics_cost/GoalCritic.data", "/critics_cost/CostCritic.data", "/critics_cost/PathAlignCritic.data", "/critics_cost/PathAngleCritic.data", "/critics_cost/PathFollowCritic.data", "/critics_cost/PreferForwardCritic.data"],
    axis_x_name="time",
    axis_y_name="critics",
    chart_name="Critics vs Time",
)
Will produce the following chart:
Topics vs Topics
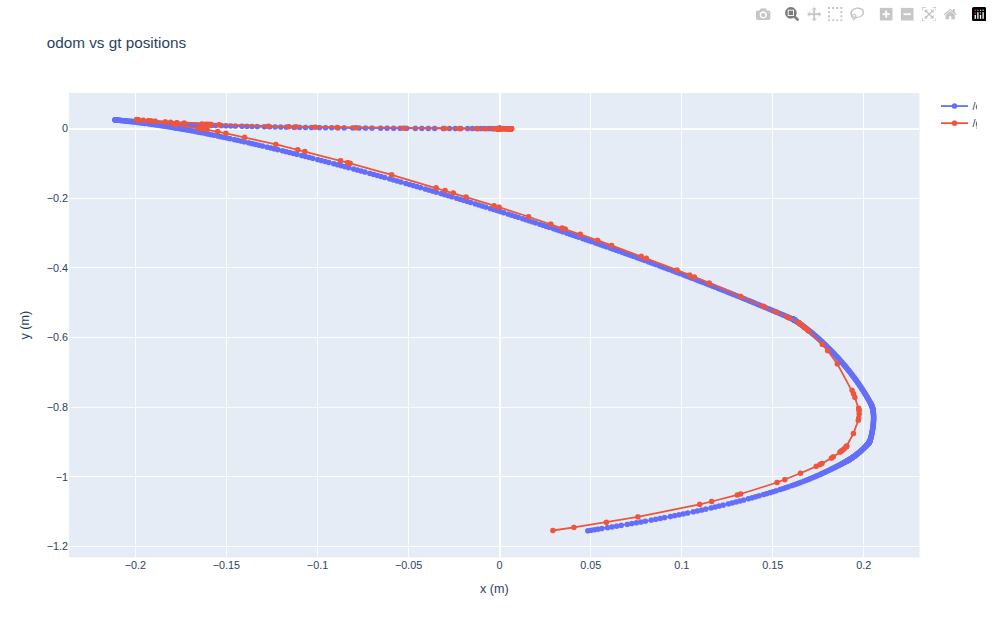
 make_chart(
        rosbag_filepath,
        topic_x=["/odom.pose.pose.position.x", "/gt_odom.pose.pose.position.x"],
        topic_y=["/odom.pose.pose.position.y", "/gt_odom.pose.pose.position.y"],
        axis_x_name="x (m)",
        axis_y_name="y (m)",
        chart_name="odom vs gt positions"
    )
Will produce the following chart:
3 - Gazebo Helpers in the Artefacts Toolkit
The Artefacts Toolkit Gazebo Helpers provide convenient functions to interact with your Gazebo simulations while running tests. These utilities allow you to inspect simulation objects, access model positions, as well as bridge topics between Gazebo and ROS2.
Import with:
from artefacts_toolkit.gazebo import bridge, gz
Functions
Function Reference
bridge.get_camera_bridge
Creates a gazebo / ros2 topic bridge for a camera topic
bridge.get_camera_bridge(
    topic_name,
    condition=None
)
Parameters
| Parameter |
Type |
Description |
Default |
topic_name |
str |
The camera topic name to bridge from Gazebo to ROS2 |
Required |
condition |
str |
Optional launch condition that determins when this bridge should be created |
None |
Returns
Node: Returns a ROS 2 Node object that runs the parameter_bridge for the specified camera topic. This node can be included in your launch description.
Note
- The bridge converts between Gazebo’s image messages (gz.msgs.Image) and ROS 2’s image messages (sensor_msgs/msg/Image)
- You need to have the ros_gz_bridge package installed in your environment
Example
The following example shows a camera bridge being created conditionally based on a launch argument. When record_video is set to “true”, the bridge will be activated, allowing ROS 2 nodes to subscribe to camera images from Gazebo. The returned Node is added to the LaunchDescription to be included in the launch process.
@pytest.mark.launch_test
def generate_test_description():
    from artefacts_toolkit.gazebo import bridge
    ...

    camera_topic = "/observation_camera/image"
    bag_recorder, rosbag_filepath = get_bag_recorder([camera_topic])
    sim = IncludeLaunchDescription(
        PythonLaunchDescriptionSource(["bringup", "/robot.launch.py"])
    )

    record_video_launch_arg = DeclareLaunchArgument(
        "record_video", default_value="true"
    )
    record_video = LaunchConfiguration("record_video")
    camera_bridge = bridge.get_camera_bridge(camera_topic, condition=IfCondition(record_video))

    return LaunchDescription(
        [
            record_video_launch_arg,
            sim,
            camera_bridge,
            controller_process,
            launch_testing.actions.ReadyToTest(),
        ]
    )
gz.add_entity
Inserts an entity XML element into a Gazebo world XML structure. This is an in-place operation that modifies the provided world XML directly.
gz.add_entity(world_xml, entity_xml)
Parameters
| Parameter |
Type |
Description |
Default |
world_xml |
xml.etree.ElementTree.Element |
The world XML structure in <sdf>...</sdf> format |
Required |
entity_xml |
xml.etree.ElementTree.Element |
The entity XML element to insert into the world |
Required |
Returns
None: This function modifies world_xml in-place and doesn’t return any value.
Example
The following example shows how to add an actor to an existing world file. After loading the world file with gz.load_world, an actor is created and then inserted into the world XML structure.
from artefacts_toolkit.gazebo import gz

# Load existing world file
world_xml = gz.load_world("worlds/env.sdf")

# Create an actor with waypoints
waypoints = [
    [4, -3.2, 1.0],
    [0.8, -3.2, 1.0],
    [0.8, -6, 1.0],
    [4, -6, 1.0],
]
actor_xml = gz.make_actor("pedestrian_1", waypoints)

# Add the actor to the world
gz.add_entity(world_xml, actor_xml)
gz.load_world
Loads and parses a Gazebo world file, returning the root XML element.
gz.load_world(world_file)
Parameters
| Parameter |
Type |
Description |
Default |
world_file |
str |
Path to the Gazebo world file to load |
Required |
Returns
xml.etree.ElementTree.Element: Returns the root XML element of the parsed world file in <sdf>...</sdf> format.
Raises
FileNotFoundError: If the specified world file does not exist.
Example
from artefacts_toolkit.gazebo import gz

# Load a world file
world_xml = gz.load_world("worlds/env.sdf")

# Now you can modify the world and add entities
actor_xml = gz.make_actor("pedestrian", [[0, 0, 0], [1, 1, 0]])
gz.add_entity(world_xml, actor_xml)
gz.get_sim_objects
Extracts model information from a Gazebo world file by parsing its XML structure. This function returns the name and original pose of all models defined in the world file.
This can useful when you need to know the initial poses of models as defined in the world file, rather than querying the running simulation (where positions might have changed due to physics, randomness, or interactions).
gz.get_sim_objects(world_file)
Parameters
| Parameter |
Type |
Description |
Default |
world_file |
str |
Path to the Gazebo world file to parse |
Required |
Returns
tuple: The function returns a tuple with two values that should be unpacked:
objects = [
    {
        "name": "model_1",
        "pose": "0 0 0 0 0 0"
    },
    {
        "name": "model_2",
        "pose": "1 2 3 0 0 0"
    },
    ...
]
- A dictionary mapping model names to poses:
objects_positions = {
    "model_1": "0 0 0 0 0 0",
    "model_2": "1 2 3 0 0 0",
    ...
}
Example
# Working with the objects_position dict
_, objects_positions = gz.get_sim_objects("world.sdf")
model_pose = objects_positions["model_1"]  # "0 0 0 0 0 0"

# Working with the objects list
objects, _ = gz.get_sim_objects("world.sdf")
for model in objects:
    print(f"{model['name']} is at position {model['pose']}")
gz.get_model_location
Gets the current (x, y, z) position of a model in a running Gazebo simulation. Unlike get_sim_objects which reads original positions from a world file, this function queries the live simulation to get the model’s current position.
gz.get_model_location(model_name)
Parameters
| Parameter |
Type |
Description |
Default |
model_name |
str |
Name of the model to query in the simulation |
Required |
Returns
tuple: Returns a tuple of three float values representing the (x, y, z) position in meters:
(x_position, y_position, z_position)
Note
- This function requires a Gazebo simulation to be running
- Returns (0.0, 0.0, 0.0) if the model position cannot be determined
Example
The example below demonstrates how to combine get_sim_objects and get_model_location to validate a pick-and-place task. It shows how to:
- Get initial positions from the world file
- Wait for a robot to complete its task
- Compare initial positions with current positions to detect which objects were moved
class TestProcOutput(unittest.TestCase):
    def test_moved_meatballs(self, proc_output, controller_process):
        # Original locations
        sim_objects, sim_objects_positions = gz.get_sim_objects("worlds/env.sdf") # this includes models poses
        meatball_models = [obj["name"] for obj in sim_objects if "karaage" in obj["name"]]
        #  Wait for the control loop to finish
        proc_output.assertWaitFor("Done with tasks execution", timeout=300)
        picked_meatballs = 0 # karaage moved for more than 10cm
        for meatball in meatball_models:
            x, y, z = gz.get_model_location(meatball)
            x_original, y_original, z_original = sim_objects_positions[meatball]
            dist = ((x - x_original) ** 2 + (y - y_original) ** 2 + (z - z_original) ** 2) ** 0.5
            if dist > 0.1: #10cm
                # Likely to have been picked and moved somewhere else
                picked_meatballs += 1
        self.assertEqual(picked_meatballs, 4)
gz.kill_gazebo
Kills the currently running gazebo process.
Returns
None: This function doesn’t return any value.
Example
from artefacts_toolkit.gazebo import gz
...

@launch_testing.post_shutdown_test()
class TestProcOutputAfterShutdown(unittest.TestCase):
    def test_exit_code(self, proc_info, controller_process, rosbag_filepath):
        gz.kill_gazebo()
        ...
gz.make_actor
Creates the necessary XML to add in an actor to your simulation. A path for the actor to move will be created based on provided waypoints, walking speed, and speed of rotation.
gz.make_actor(
    actor_name,
    waypoints,
    walk_speed=0.8,
    rotate_speed=1.8,
    enable_loop=True,
    output_type="xml"
)
Parameters
| Parameter |
Type |
Description |
Default |
actor_name |
str |
The name to call your actor. Noted in xml as <actor name="{actor_name}"> |
Required |
waypoints |
list |
List of waypoint coordinates. Can be either [[x,y,z], ...] for position only, or [[x,y,z,roll,pitch,yaw], ...] for position and rotation |
Required |
walk_speed |
float |
Walking speed of the actor in meters per second |
0.8 |
rotate_speed |
float |
Rotation speed of the actor in radians per second |
1.8 |
enable_loop |
bool |
Whether the actor should continuously repeat the waypoint path |
True |
output_type |
str |
Whether to return as xml object or str string |
"xml" |
Returns
output_type can be set to "xml" or "str":
xml: Returns an XML object representation of a Gazebo actor (xml.etree.ElementTree.Element)str : Returns an XML string representation of a Gazebo actor
<actor name="{actor_name}">
    <skin>
        <filename>https://fuel.gazebosim.org/1.0/Mingfei/models/actor/tip/files/meshes/walk.dae</filename>
    </skin>

    <animation name="walking">
        <filename>https://fuel.gazebosim.org/1.0/Mingfei/models/actor/tip/files/meshes/walk.dae</filename>
        <interpolate_x>true</interpolate_x>
    </animation>

    <script>
        <loop>true / false</loop>
        <delay_start>0.0</delay_start>
        <auto_start>true</auto_start>

        <trajectory id="0" type="walking">
            <!-- The generated waypoints given the provided inputs -->
        </trajectory>
    </script>
</actor>
Example
Given the following waypoints:
waypoints = [
    [4, -3.2, 1.0],
    [0.8, -3.2, 1.0],
    [0.8, -6, 1.0],
    [4, -6, 1.0],
]
actor_xml = gz.make_actor("my_actor", waypoints, walk_speed=0.8, rotate_speed=1.8, enable_loop=True)
will return the following xml:
<actor name="my_actor">
    <skin>
        <filename>https://fuel.gazebosim.org/1.0/Mingfei/models/actor/tip/files/meshes/walk.dae</filename>
    </skin>

    <animation name="walking">
        <filename>https://fuel.gazebosim.org/1.0/Mingfei/models/actor/tip/files/meshes/walk.dae</filename>
        <interpolate_x>true</interpolate_x>
    </animation>

    <script>
        <loop>true</loop>
        <delay_start>0.0</delay_start>
        <auto_start>true</auto_start>

        <trajectory id="0" type="walking">
            <waypoint>
                <time>0</time>
                <pose>4 -3.2 1.0 0 0 3.141592653589793</pose>
            </waypoint>
            <waypoint>
                <time>4.0</time>
                <pose>0.8 -3.2 1.0 0 0 3.141592653589793</pose>
            </waypoint>
            <waypoint>
                <time>6.617993877991495</time>
                <pose>0.8 -3.2 1.0 0 0 -1.5707963267948966</pose>
            </waypoint>
            <waypoint>
                <time>10.117993877991495</time>
                <pose>0.8 -6 1.0 0 0 -1.5707963267948966</pose>
            </waypoint>
            <waypoint>
                <time>10.99065850398866</time>
                <pose>0.8 -6 1.0 0 0 0.0</pose>
            </waypoint>
            <waypoint>
                <time>14.99065850398866</time>
                <pose>4 -6 1.0 0 0 0.0</pose>
            </waypoint>
            <waypoint>
                <time>15.863323129985826</time>
                <pose>4 -6 1.0 0 0 1.5707963267948966</pose>
            </waypoint>
            <waypoint>
                <time>19.363323129985826</time>
                <pose>4 -3.2 1.0 0 0 1.5707963267948966</pose>
            </waypoint>
            <waypoint>
                <time>20.23598775598299</time>
                <pose>4 -3.2 1.0 0 0 3.141592653589793</pose>
            </waypoint>

        </trajectory>
    </script>
</actor>
4 - Rosbag Helpers in the Artefacts Toolkit
The Artefacts Toolkit Rosbag Helpers provide convenient functions to create, record, and extract data from ROS bag files while running tests. These utilities help you capture topic data to be processed for analysis and visualisation.
Import with:
from artefacts_toolkit.rosbag import get_bag_recorder, image_topics, message_topics
Functions
Function Reference
get_bag_recorder
Creates a rosbag2 recorder for a given list of topic names and returns the node and the filepath
rosbag.get_bag_recorder(
    topic_names,
    directory="rosbags",
    use_sim_time=False
)
Parameters
| Parameter |
Type |
Description |
Default |
topic_names |
list[str] |
List of ROS topics to record |
Required |
directory |
str |
Directory where the rosbag will be saved |
"rosbags" |
use_sim_time |
bool |
Whether to use simulation time instead of system time |
False |
Returns
tuple: Returns a tuple containing:
bag_recorder(ExecuteProcess): Launch Action that runs the recorder process.rosbag_filepath(str): Path to the rosbag file that will be created.
Note
- File format will be MCAP.
- Rosbag files are automatically named with a timestamp in the format
"rosbag2_" + yyyymmddhhmmss.
- The
bag_recorder process must be added to your LaunchDescription.
- Rosbags are automatically uploaded to the artefacts dashboard unless you use the
--no upload flag when using artefacts run.
Example
The following example shows a test launch file using the bag_recorder helper to record a rosbag, add the bag_recorder to the launch description, and later use the rosbag_filepath for an assertion test (using another rosbag helper get_final_message):
@pytest.mark.launch_test
def generate_test_description():
    camera_topics = ["/depth_cam/rgb"]
    extra_topics = ["/odom", "/noisy_estimate"]

    bag_recorder, rosbag_filepath = rosbag.get_bag_recorder(
        camera_topics + extra_topics, use_sim_time=False
    )

    test_odometry_node = ExecuteProcess(
        cmd=[
            "python3",
            "src/test_odometry_node.py",
        ]
    )
    return LaunchDescription(
        [
            test_odometry_node,
            launch_testing.actions.ReadyToTest(),
            bag_recorder,
        ]
    ), {
        "test_odometry_node": test_odometry_node,
        "rosbag_filepath": rosbag_filepath,
    }


@launch_testing.post_shutdown_test()
class TestProcOutputAfterShutdown(unittest.TestCase):
    def test_end_position(self, rosbag_filepath):
        final_distance_from_start = message_topics.get_final_message(
            rosbag_filepath, "/distance_from_start.data"
        )

        assert final_distance_from_start < 0.1, (
            f"Final distance from start is {final_distance_from_start}, expected less than 10cm"
        )
Returns the last recorded image from a provided camera topic.
image_topics.extract_camera_image(
    rosbag_file_path,
    camera_topic,
    output_dir="output"
)
Parameters
| Parameter |
Type |
Description |
Default |
rosbag_file_path |
str |
Path to the recorded rosbag |
Required |
camera_topic |
str |
Name of the ROS camera topic to take the image from |
Required |
output_dir |
str |
Directory where to save the extracted image to |
"output" |
Returns
None: The image will be saved to the output_dir specified.
Note
- Images are saved in the
.png format
- By setting
output_dir to the same directory as output_dirs in your artefacts.yaml file, the image will be automatically uploaded to the artefacts dashboard after conclusion of the test.
Example
The following example shows how to extract the last camera image from the rosbag after the test has concluded. We use the rosbag_filepath returned by the rosbag.get_rosbag_recorder function.
from artefacts_toolkit.rosbag import rosbag, image_topics
def test_exit_code(
    self, proc_info, test_odometry_node, rosbag_filepath
):
    ...

    image_topics.extract_camera_image(rosbag_filepath, "/depth_cam/rgb")
Creates a WebM video by combining all images from a provided camera topic.
image_topics.extract_video(
    bag_path,
    topic_name,
    output_path,
    frame_rate=20
)
Parameters
| Parameter |
Type |
Description |
Default |
bag_path |
str |
Path to the recorded rosbag |
Required |
topic_name |
str |
Name of the ROS camera topic to create the video from |
Required |
output_path |
str |
Path where the video will be saved (.webm) |
Required |
frame_rate |
int |
Frame rate to use for the created video |
20 |
Returns
None: The video file will be saved to the output_path specified.
Notes
Note
- Videos will be saved in WebM format. It will be automatically set if not present in
output_path
- By saving to a directory specified in
output_dirs in your artefacts.yaml file, the video will be automatically uploaded to the artefacts dashboard.
Example
The following example shows how to extract a video from the rosbag after the test has concluded. We use the rosbag_filepath returned by the rosbag.get_rosbag_recorder function.
from artefacts_toolkit.rosbag import rosbag, image_topics
def test_exit_code(
    self, proc_info, test_odometry_node, rosbag_filepath
):
    ...

    image_topics.extract_video(rosbag_filepath, "/depth_cam/rgb", "output/depth_cam.webm")
message_topics.get_final_message
Retrieves the final message from a specified topic in a rosbag, with optional attribute access using dot notation.
message_topics.get_final_message(
    rosbag_filepath,
    topic
)
Parameters
| Parameter |
Type |
Description |
Default |
rosbag_filepath |
str |
Path to the recorded rosbag |
Required |
topic |
str |
Topic name. Use dot notation to drill down message attributes (e.g., “/distance.data”) |
Required |
Returns
Any: Returns the value of the specified message attribute. The type depends on the accessed field.
Note
- Supports attribute access using dot notation (e.g., “/distance.data”)
Example
We will use the same example from the rosbag.get_bag_recorder explanation. Note we get the data from the distance_from_start topic in order to make our assertion test.
@launch_testing.post_shutdown_test()
class TestProcOutputAfterShutdown(unittest.TestCase):
    def test_end_position(self, rosbag_filepath):
        final_distance_from_start = message_topics.get_final_message(
            rosbag_filepath, "/distance_from_start.data"
        )

        assert final_distance_from_start < 0.1, (
            f"Final distance from start is {final_distance_from_start}, expected less than 10cm"
        )
5 - Rerun Helpers in the Artefacts Toolkit
The Artefacts Toolkit Rerun Helpers provide convenient functions for tests that record a Rerun .rrd file during a simulation and then make their assertions against that recording, rather than against the simulator itself.
This splits a test into two independent halves. The simulator (or a logger node next to it) records while the test itself then asserts against the recording, so no ROS or simulator knowledge is needed to write the assertions.
Import with:
from artefacts_toolkit.rerun import recorder, reader, video
Note
- The helpers wrap the parts of
rerun-sdk that change between releases (recording sinks, the dataframe/query API), so test code written against them keeps working across Rerun upgrades.
- Data columns are named
"/entity:Archetype:field", for example "/base:Transform3D:translation" or "/base/yaw:Scalars:scalars". Use reader.get_columns to list the columns in a recording.
- Every
reader and video function accepts either the path to a .rrd file or the object returned by reader.load.
Functions
Function Reference
recorder.get_output_dir
Returns (and creates) the directory that recordings and other test outputs should be written to.
recorder.get_output_dir(
    directory=None
)
Parameters
| Parameter |
Type |
Description |
Default |
directory |
str or Path |
Explicit directory to use instead of the defaults |
None |
Returns
Path: The absolute path of the output directory.
Note
- When
directory is not given, the ARTEFACTS_SCENARIO_UPLOAD_DIR environment variable is used. It is set by artefacts run, and everything in it is uploaded to the Artefacts Dashboard when the scenario finishes.
- When neither is available (for example running
pytest locally), ./test_outputs is used.
Example
The same directory is resolved on the simulator side and on the test side, so both agree on where the recording is:
from artefacts_toolkit.rerun import recorder

OUTPUT_FOLDER = recorder.get_output_dir()
rrd_path = OUTPUT_FOLDER / "my-rerun-recording.rrd"
recorder.start_recording
Starts a Rerun recording saved to directory/filename and returns the recording stream and the file path.
recorder.start_recording(
    application_id,
    filename="recording.rrd",
    directory=None,
    handle_sigterm=True
)
Parameters
| Parameter |
Type |
Description |
Default |
application_id |
str |
Name of the application shown in the Rerun viewer |
Required |
filename |
str or Path |
Name of the .rrd file. May also be an absolute path, in which case directory is ignored |
"recording.rrd" |
directory |
str or Path |
Directory to save to, resolved like get_output_dir |
None |
handle_sigterm |
bool |
Close the recording and exit cleanly when the process receives SIGTERM |
True |
Returns
tuple: Returns a tuple containing:
recording (rerun.RecordingStream): The started recording. It is also made the global recording, so plain rr.log(...) and rr.set_time(...) calls go to it.path (Path): Path to the .rrd file being written.
Note
- A stale file of the same name is removed before recording starts.
- Test harnesses usually stop the simulator with
Popen.terminate() (SIGTERM). With handle_sigterm, the recording is closed first, so the file is complete even if the harness then kills the process during slower cleanup such as closing video encoders.
- Some native libraries reset signal handlers when they initialise (limxsdk’s
Robot.init does). Call start_recording after them.
- Recordings are automatically uploaded to the Artefacts Dashboard unless you use the
--no-upload flag with artefacts run.
Example
In the following example the simulator records the base pose and the joystick commands on a sim_time timeline, and is stopped by the test harness once the mission ends. Setting your own timeline with rr.set_time is what lets the test later line data up by simulation time rather than wall-clock time.
import rerun as rr
import simulator as sim
from artefacts_toolkit.rerun import recorder


class RerunSimulator(sim.SimulatorMujoco):
    def _set_sim_time(self):
        rr.set_time("sim_time", duration=float(self.mujoco_data.time))

    def _log_joy(self, joy):
        self._set_sim_time()
        rr.log("cmd/fwd", rr.Scalars(joy.axes[1]))
        rr.log("cmd/yaw", rr.Scalars(joy.axes[2]))

    def _read_state(self):
        super()._read_state()
        q = self.mujoco_data.qpos  # [0:3] base xyz, [3:7] base quat wxyz
        w, x, y, z = q[3:7]
        self._set_sim_time()
        rr.log("base", rr.Transform3D(translation=q[0:3],
                                      quaternion=rr.Quaternion(xyzw=[x, y, z, w])))
        rr.log("base/yaw", rr.Scalars(yaw_from_quat(w, x, y, z)))


def main():
    robot = sim.Robot(sim.RobotType.Tron2, True)
    robot.init("127.0.0.1")

    # After robot.init(): the SDK resets signal handlers
    recorder.start_recording("tron2_loop", "recording-loop.rrd")

    RerunSimulator(...).run()
reader.load
Loads a recording into memory once, so several assertions can share it without re-reading the file.
Parameters
| Parameter |
Type |
Description |
Default |
rrd |
str or Path |
Path to the .rrd file |
Required |
Returns
ChunkStore: The loaded recording. Every other reader and video function accepts it in place of the path.
Note
- Files written by older Rerun versions, or by a process that was killed before finishing, are read as well.
Example
from artefacts_toolkit.rerun import reader


@pytest.fixture(scope="module")
def recording(recording_path):
    assert recording_path.exists(), f"Recording not found at {recording_path}"
    return reader.load(recording_path)
reader.get_entity_paths
Returns all entity paths logged in the recording.
reader.get_entity_paths(
    rrd
)
Parameters
| Parameter |
Type |
Description |
Default |
rrd |
str, Path or ChunkStore |
Path to the recording, or a loaded one |
Required |
Returns
list[str]: The entity paths, for example ["/base", "/base/yaw", "/cmd/fwd"].
Example
assert "/bodies/uwb_tag" in reader.get_entity_paths(recording), "target was never logged"
reader.get_timelines
Returns the names of the timelines in the recording.
reader.get_timelines(
    rrd
)
Parameters
| Parameter |
Type |
Description |
Default |
rrd |
str, Path or ChunkStore |
Path to the recording, or a loaded one |
Required |
Returns
list[str]: The timeline names, for example ["log_time", "sim_time"].
Note
log_time is always present: Rerun adds it automatically. The timeline you set yourself with rr.set_time is the one the other helpers use by default.
reader.get_columns
Returns the data column names of the recording, optionally only those of one entity.
reader.get_columns(
    rrd,
    entity=None
)
Parameters
| Parameter |
Type |
Description |
Default |
rrd |
str, Path or ChunkStore |
Path to the recording, or a loaded one |
Required |
entity |
str |
Only list the columns of this entity |
None |
Returns
list[str]: Column names in the "/entity:Archetype:field" form.
Example
>>> reader.get_columns(recording, "/base")
['/base:Transform3D:quaternion', '/base:Transform3D:translation']
reader.get_column
Returns the times and values of one column, ordered by a timeline.
reader.get_column(
    rrd,
    column,
    timeline=None
)
Parameters
| Parameter |
Type |
Description |
Default |
rrd |
str, Path or ChunkStore |
Path to the recording, or a loaded one |
Required |
column |
str |
Column name, e.g. "/base/yaw:Scalars:scalars" |
Required |
timeline |
str |
Timeline to order by. Defaults to the recording’s own timeline (the first one that is not log_time), else log_time |
None |
Returns
tuple: Returns a tuple containing:
times (numpy.ndarray): Float seconds for duration timelines, datetime64 for timestamp timelines, integers for sequence timelines.values (numpy.ndarray): Shape (n,) for scalars and (n, 3) for 3-vectors. When rows hold a varying number of instances (e.g. point clouds), an object array of per-row arrays.
Note
- Raises
KeyError when the column does not exist.
Example
times, yaw = reader.get_column(recording, "/base/yaw:Scalars:scalars")
assert times[-1] > 60.0, "mission ended early"
assert np.abs(yaw).max() <= np.pi
reader.get_final_message
Retrieves the last value logged to a column, or the value of a static column.
reader.get_final_message(
    rrd,
    column
)
Parameters
| Parameter |
Type |
Description |
Default |
rrd |
str, Path or ChunkStore |
Path to the recording, or a loaded one |
Required |
column |
str |
Column name, e.g. "/base:Transform3D:translation" |
Required |
Returns
Any: The value, unwrapped: a float for Scalars, a length-3 array for a translation, an (n, 3) array for a Points3D with several points.
Example
Waypoints are logged once (static) as Points3D, and the test measures how far the robot strays from the track they describe:
wp_col = "/network/mission_waypoints:Points3D:positions"
assert wp_col in reader.get_columns(recording), f"Could not find {wp_col} in recording"

track = np.vstack(reader.get_final_message(recording, wp_col))[:, :2]  # N x 2
reader.get_message_count
Returns the number of log calls made to an entity.
reader.get_message_count(
    rrd,
    entity
)
Parameters
| Parameter |
Type |
Description |
Default |
rrd |
str, Path or ChunkStore |
Path to the recording, or a loaded one |
Required |
entity |
str |
Entity path, e.g. "/cam" |
Required |
Returns
int: The number of (non-static) rows logged to the entity, 0 if it does not exist.
Example
assert reader.get_message_count(recording, "/cam") >= 100, "camera stopped publishing"
reader.to_dataframe
Returns the recording as a pandas DataFrame, one row per time on the chosen timeline.
Different entities are usually logged at different rates: a pose every simulation step, a joystick command only when it changes. With step, every selected entity is resampled onto one uniform time grid and, with fill_latest_at, gaps are filled with the latest earlier value, so a sparse command topic lines up row by row with a dense pose stream and the two can be compared directly.
reader.to_dataframe(
    rrd,
    contents=None,
    index=None,
    step=None,
    fill_latest_at=True
)
Parameters
| Parameter |
Type |
Description |
Default |
rrd |
str, Path or ChunkStore |
Path to the recording, or a loaded one |
Required |
contents |
str or list[str] |
Entities to include: "/base" for one entity, "/base/**" for a subtree, or a list of those. All entities when None |
None |
index |
str |
Timeline to use as the row index. Defaults like get_column |
None |
step |
float |
Resample onto a uniform grid of this many seconds, from the first to the last time |
None |
fill_latest_at |
bool |
Fill gaps with the latest earlier value of each column |
True |
Returns
pandas.DataFrame: The timeline column comes first (float seconds for duration timelines), followed by one column per "/entity:Archetype:field". Static data is joined onto every row. Scalars columns are plain float64 (NaN where nothing was logged); vectors are arrays.
Note
- Without
step, there is one row per time at which any of the selected entities was logged.
- Vector cells are numpy arrays.
np.vstack(df[column]) turns a translation column into an (n, 3) array.
Example
@pytest.fixture(scope="module")
def df(recording_path):
    """Whole recording resampled onto a uniform 20 ms sim-time grid."""
    frame = reader.to_dataframe(recording_path, ["/base/**", "/cmd/**"], index="sim_time", step=0.02)

    out = frame.dropna(subset=["/base:Transform3D:translation"]).reset_index(drop=True)
    out["x"] = [t[0] for t in out["/base:Transform3D:translation"]]
    out["y"] = [t[1] for t in out["/base:Transform3D:translation"]]
    out["yaw"] = out["/base/yaw:Scalars:scalars"]
    out["cmd_fwd"] = out["/cmd/fwd:Scalars:scalars"].fillna(0.0)
    return out


def test_straights_cover_side_length(df, straights):
    for i, (a, b) in enumerate(straights):
        dist = math.hypot(df["x"][b - 1] - df["x"][a], df["y"][b - 1] - df["y"][a])
        assert abs(dist - SIDE_LENGTH) < DIST_TOLERANCE
Creates an MP4 video from a camera entity in the recording.
video.extract_video(
    rrd,
    entity,
    output_path,
    timeline=None,
    frame_rate=20
)
Parameters
| Parameter |
Type |
Description |
Default |
rrd |
str, Path or ChunkStore |
Path to the recording, or a loaded one |
Required |
entity |
str |
Entity path of the camera, e.g. "/cam" |
Required |
output_path |
str or Path |
Path where the video will be saved (.mp4) |
Required |
timeline |
str |
Timeline to order frames by. Defaults like get_column |
None |
frame_rate |
int |
Frame rate used when encoding rr.Image frames |
20 |
Returns
Path: The path of the saved video.
Note
- Works for entities logged as
rr.Image frames (encoded with H.264 at frame_rate) and for rr.VideoStream entities with H.264 samples (remuxed as-is, keeping the recording’s timestamps).
- The
.mp4 extension is added if not present in output_path.
- By saving to the directory returned by
recorder.get_output_dir, the video is automatically uploaded to the Artefacts Dashboard.
Example
from artefacts_toolkit.rerun import recorder, video

video.extract_video(recording, "/cam", recorder.get_output_dir() / "head_camera.mp4")
Saves the last image logged to a camera entity as a PNG.
video.extract_camera_image(
    rrd,
    entity,
    output_dir="output"
)
Parameters
| Parameter |
Type |
Description |
Default |
rrd |
str, Path or ChunkStore |
Path to the recording, or a loaded one |
Required |
entity |
str |
Entity path of the camera, e.g. "/cam" |
Required |
output_dir |
str or Path |
Directory where to save the extracted image |
"output" |
Returns
Path: The path of the saved image, output_dir/<entity>.last.png with / replaced by _ (for example output/_cam.last.png).
Note
- Only
rr.Image entities with 8-bit L, RGB, RGBA, BGR or BGRA pixels are supported.
Example
video.extract_camera_image(recording, "/cam", recorder.get_output_dir())
6 - Navigation Helpers in the Artefacts Toolkit
The Artefacts Toolkit Navigation Helpers provide convenient functions, as well as a CLI tool, for automated navigation tests. Record a route directly in RViz, generate a simulator world from its 2D map, then load and drive the route in your tests.
Import with:
from artefacts_toolkit.navigation import <function>
Note
- The navigation helpers are currently heavily dependent on Nav2 and have been tested on ROS 2 Humble (Python 3.10) and Jazzy (Python 3.12).
ros-<distro>-nav2-simple-commander and ros-<distro>-tf2-ros are required.
- Routes are recorded with the
artefacts-route command from artefacts-route-recorder, which is included with the toolkit. See Recording a route.
Recording a route
A route is a YAML file holding the 2D Pose Estimate it was recorded from (initial_pose), the waypoints, and which map it was recorded on. You will need both the map yaml and pgm files. Record one from the directory you will run your tests from:
artefacts-route record [save/to/route.yaml] --map <map/to/load.yaml>
A Nav2 map_server with your map plus RViz will be launched. Set the start with 2D Pose Estimate, then click the waypoints with Publish Point. Close RViz or press enter in the terminal to save the route to routes/<date>_<time>.yaml, or pass a path ([save/to/route.yaml]) to save to a specific location.
| Option |
Description |
FILE |
Where to save the route (letters, digits, - and _). Default: ./routes/<date>_<time>.yaml |
--map MAP_YAML |
Launch map_server with this map plus RViz, and record the map reference |
--map-ref MAP_YAML |
Record this map’s path and hash without launching anything (RViz and the map are already up) |
--force |
Overwrite FILE if it exists |
Other subcommands:
artefacts-route list: list saved routes.artefacts-route show: print a route and any problems with it.artefacts-route replay: publishes a route as RViz markers.
Functions
Launch file helpers:
Test helpers:
Function Reference
load_route
Loads a route recorded with artefacts-route record.
Parameters
| Parameter |
Type |
Description |
Default |
route |
str or Path |
Path to a route file. None loads the most recently recorded route from ./routes/ |
None |
Returns
Route: The loaded route, with name, frame_id, initial_pose, waypoints and map attributes.
Note
- Raises
UserError if there is no such route or its file cannot be read.
Example
from artefacts_toolkit.navigation import load_route

route = load_route()                     # the most recently recorded route
route = load_route("routes/lab.yaml")    # a specific route
route_launch_args
Returns the launch arguments that spawn the robot at the route’s start.
route_launch_args(
    route,
    x=None,
    y=None,
    yaw=None,
    names=("x_pose", "y_pose", "yaw"),
    map_arg="map"
)
Parameters
| Parameter |
Type |
Description |
Default |
route |
Route |
The route, from load_route |
Required |
x |
float |
Spawn the robot at this x instead of the recorded start |
None |
y |
float |
Spawn the robot at this y instead of the recorded start |
None |
yaw |
float |
Spawn the robot facing this heading (radians) instead of the recorded start |
None |
names |
Sequence[str] |
The names your launch file declares for the spawn pose arguments, if different from default |
("x_pose", "y_pose", "yaw") |
map_arg |
str or None |
Name of the map launch argument. None leaves the map out |
"map" |
Returns
dict[str, str]: For example {"x_pose": "0.59", "y_pose": "-1.45", "yaw": "1.5708", "map": "/maps/lab.yaml"}.
Example
from artefacts_toolkit.navigation import load_route, route_launch_args

route = load_route()
args = route_launch_args(route)
IncludeLaunchDescription(my_sim_launch, launch_arguments=args.items())
route_start_pose
Returns the route’s start pose (the 2D Pose Estimate it was recorded from), optionally overriding any of its components.
route_start_pose(
    route,
    x=None,
    y=None,
    yaw=None
)
Parameters
| Parameter |
Type |
Description |
Default |
route |
Route |
The route |
Required |
x |
float |
Override the start x |
None |
y |
float |
Override the start y |
None |
yaw |
float |
Override the start yaw (radians) |
None |
Returns
Pose2D: The start pose with x, y and yaw attributes.
Note
- If the route was recorded without a 2D Pose Estimate,
x, y and yaw must all be given, otherwise UserError is raised.
check_map_match
Raises UserError if map_yaml is not the map the route was recorded on. Useful to ensure a route is never driven on the wrong map.
check_map_match(
    route,
    map_yaml,
    ignore_mismatch=False
)
Parameters
| Parameter |
Type |
Description |
Default |
route |
Route |
The route |
Required |
map_yaml |
str or Path |
The map your launch file loads |
Required |
ignore_mismatch |
bool |
Warn instead of raising when the maps differ |
False |
Returns
list[str]: Warnings, such as the route having no map hash to compare against, or the mismatch being ignored.
Note
- Only needed when your launch file does not take the map from the route (see
route_launch_args).
map_to_world
Writes a simulator world extruded up from a Nav2 map (the yaml plus pgm, e.g. saved from the real robot). Compatible with Isaac Sim, Newton, MuJoCo, and Gazebo.
Creating the world is relatively cheap (milliseconds) and so it can be generated at runtime each time.
map_to_world(
    map_yaml,
    out=None,
    format=None,
    wall_height=1.0,
    fill_gaps=True,
    crop=None
)
Parameters
| Parameter |
Type |
Description |
Default |
map_yaml |
str or Path |
The Nav2 map yaml. (The pgm needs to be in the same location as well.) |
Required |
out |
str or Path |
Where to write the world, if required. |
worlds/<map name>.<ext> |
format |
str |
"usda" (Isaac Sim, Newton), "mjcf" (MuJoCo, Newton) or "sdf" (Gazebo). Taken from the extension of out when given |
"usda" |
wall_height |
float |
Wall height in metres |
1.0 |
fill_gaps |
bool |
Fill gaps of up to two cells between occupied cells (scan noise) before extruding |
True |
crop |
tuple[Route, float] |
(route, metres): keep only the walls within that many metres of the way the robot will go along the route. Reduces physics calculations for large maps. |
None |
Returns
str: The absolute path of the world file written, to hand to the simulator.
Note
usda and mjcf worlds hold the ground and walls only, the robot and its sensors being the simulator’s. sdf is a complete Gazebo world.- Generating a world takes milliseconds, so do it at runtime in your launch file and treat the file as disposable.
- The world is only good for driving around in, it is not designed to be “nice”.
Example
The following launch file loads the route recorded last, extrudes a Gazebo world from the route’s map, and includes Nav2’s TurtleBot3 demo in that world with the robot at the route’s start:
import os

from ament_index_python.packages import get_package_share_directory
from launch import LaunchDescription
from launch.actions import DeclareLaunchArgument, IncludeLaunchDescription, OpaqueFunction
from launch.launch_description_sources import PythonLaunchDescriptionSource
from launch.substitutions import LaunchConfiguration

from artefacts_toolkit.navigation import load_route, map_to_world, route_launch_args


def include_demo(context):
    route = load_route()  # the route recorded last
    headless = LaunchConfiguration("headless").perform(context)

    # x_pose, y_pose, yaw and map, named as the demo names them.
    args = route_launch_args(route)
    args["headless"] = headless
    args["use_rviz"] = str(headless.lower() not in ("true", "1", "yes"))
    # The world: the route's map, extruded into walls (milliseconds), so the
    # simulation matches the map the route was recorded on.
    args["world"] = map_to_world(route.map.file, format="sdf")

    demo = os.path.join(
        get_package_share_directory("nav2_bringup"), "launch", "tb3_simulation_launch.py")
    return [IncludeLaunchDescription(
        PythonLaunchDescriptionSource(demo), launch_arguments=args.items())]


def generate_launch_description():
    return LaunchDescription([
        DeclareLaunchArgument(
            "headless", default_value="True", description="no Gazebo GUI and no RViz"),
        OpaqueFunction(function=include_demo),
    ])
follow_route
Drives a route through the running Nav2 stack and returns a RouteResult.
Use in your test file.
follow_route(
    route=None,
    timeout_s=300.0,
    startup_timeout_s=60.0,
    label=None,
    results_dir=None,
    set_initial_pose=True,
    base_frame="base_link",
    scan_topic="scan"
)
Parameters
| Parameter |
Type |
Description |
Default |
route |
str or Path |
Path to the route to drive, as for load_route. None drives the route recorded last |
None |
timeout_s |
float or None |
After this many seconds the goal is cancelled and the outcome is "timeout". None waits forever |
300.0 |
startup_timeout_s |
float |
How long to wait for Nav2 to become active before raising EnvError |
60.0 |
label |
str |
A label added to the result and its file name |
None |
results_dir |
str or Path |
Directory to also write the result to, as a YAML file |
None |
set_initial_pose |
bool |
Tell AMCL the robot is at the route’s start before driving. False on a robot that is already localised |
True |
base_frame |
str |
The robot frame, for the final pose error |
"base_link" |
scan_topic |
str or None |
The LaserScan topic to measure clearance from. None to skip |
"scan" |
Returns
RouteResult: What happened. A failed run is a result, not an exception.
Note
- Nav2 must already be up. In order,
follow_route waits for amcl and bt_navigator to be active, publishes the route’s initial pose and waits for AMCL to take it, sends the waypoints as one FollowWaypoints goal, waits for it to end, and reads the robot’s pose from tf for the final pose error.
- Clearance is measured from the lidar, not from the robot’s edge.
- Raises
UserError for a bad route, and EnvError when ROS is not sourced, Nav2’s Python API is missing, or no stack shows up.
- Setting
results_dir to the ARTEFACTS_SCENARIO_UPLOAD_DIR environment variable uploads the result YAML to the Artefacts Dashboard when the scenario finishes.
Example
The following test runs the launch file from the map_to_world example in a fixture, drives the route recorded last, and asserts on the result:
import os
import signal
import subprocess
import time
from pathlib import Path

import pytest

from artefacts_toolkit.navigation import (
    assert_each_waypoint_reached, assert_final_pose, assert_max_recoveries,
    assert_min_clearance, follow_route)

HEADLESS = os.environ.get("HEADLESS", "false").lower() not in ("0", "false", "no")
RESULTS_DIR = os.environ.get("ARTEFACTS_SCENARIO_UPLOAD_DIR", "results")
LAUNCH_FILE = Path(__file__).with_name("nav2_sim.launch.py")


@pytest.fixture
def sim(tmp_path):
    """The TurtleBot3 demo, up for one test and shut down after it."""
    command = ["ros2", "launch", str(LAUNCH_FILE), "headless:={}".format(HEADLESS)]
    with (tmp_path / "sim.log").open("w") as out:
        proc = subprocess.Popen(command, stdout=out, stderr=subprocess.STDOUT,
                                start_new_session=True)
    time.sleep(15)  # let Gazebo and Nav2 come up
    try:
        yield
    finally:
        os.killpg(proc.pid, signal.SIGINT)  # ros2 launch shuts its processes down in order
        proc.wait(timeout=30)


def test_route_is_completed(sim):
    result = follow_route(timeout_s=300, results_dir=RESULTS_DIR)  # the route recorded last
    assert_each_waypoint_reached(result, tolerance_m=0.5)
    assert_final_pose(result, max_pos_error_m=0.5)
    assert_min_clearance(result, 0.15)  # from the lidar: the TurtleBot3's is near its middle
    assert_max_recoveries(result, 2)
Note
The assert_* helpers check a RouteResult, which only follow_route produces. They rely on the toolkit having driven the route itself and so cannot be used if you are driving the robot in another way.
Each helper raises an AssertionError on a failed assertion.
assert_route_completed
Raises AssertionError unless Nav2 finished the route and skipped no waypoint.
assert_route_completed(
    result
)
Parameters
| Parameter |
Type |
Description |
Default |
result |
RouteResult |
The result from follow_route |
Required |
assert_each_waypoint_reached
Raises AssertionError unless every waypoint was reached, and within tolerance_m of it when given.
assert_each_waypoint_reached(
    result,
    tolerance_m=None
)
Parameters
| Parameter |
Type |
Description |
Default |
result |
RouteResult |
The result from follow_route |
Required |
tolerance_m |
float |
How close the robot must have come to each waypoint |
None |
Note
- A tolerance looser than Nav2’s
xy_goal_tolerance will almost never fail.
assert_final_pose
Raises AssertionError unless the robot ended close enough to the last waypoint.
assert_final_pose(
    result,
    max_pos_error_m=0.5,
    max_yaw_error_rad=None
)
Parameters
| Parameter |
Type |
Description |
Default |
result |
RouteResult |
The result from follow_route |
Required |
max_pos_error_m |
float |
Maximum distance from the last waypoint |
0.5 |
max_yaw_error_rad |
float |
Maximum yaw difference from the last waypoint |
None |
assert_min_clearance
Raises AssertionError if any laser return was ever nearer than min_m.
assert_min_clearance(
    result,
    min_m
)
Parameters
| Parameter |
Type |
Description |
Default |
result |
RouteResult |
The result from follow_route |
Required |
min_m |
float |
Minimum allowed distance to an obstacle, in metres |
Required |
Note
- Measured from the lidar, so add the distance from the lidar to the robot’s edge.
assert_max_recoveries
Raises AssertionError if Nav2 ran more than max_recoveries recovery behaviours (spin, back up, wait, …).
assert_max_recoveries(
    result,
    max_recoveries=0
)
Parameters
| Parameter |
Type |
Description |
Default |
result |
RouteResult |
The result from follow_route |
Required |
max_recoveries |
int |
Maximum number of recovery behaviours allowed |
0 |
RouteResult
What one follow_route run produced.
| Attribute |
Type |
Description |
succeeded |
bool |
Nav2 finished the route and skipped no waypoint. |
outcome |
str |
"succeeded", "failed", "canceled" or "timeout" |
error |
str or None |
Error message when outcome is not "succeeded" |
duration_s |
float |
Wall-clock seconds from sending the route to its end |
waypoints_total |
int |
Number of waypoints in the route |
missed_waypoints |
list[int] |
Indices of the waypoints Nav2 skipped |
waypoints |
list[WaypointResult] |
How each waypoint went (see below) |
final_pos_error_m |
float or None |
Distance from the robot to the last waypoint at the end, from tf |
final_yaw_error_rad |
float or None |
Yaw difference from the last waypoint at the end |
recoveries |
int |
Recovery behaviours Nav2 ran over the whole route |
min_clearance_m |
float or None |
Nearest laser return over the whole route |
warnings |
list[str] |
Anything that could not be measured, and why |
Each WaypointResult in result.waypoints has:
| Attribute |
Type |
Description |
index |
int |
The waypoint’s index in the route |
reached |
bool |
Whether Nav2 reached it |
time_s |
float or None |
Seconds from the start of the route to reaching it |
closest_approach_m |
float or None |
Nearest the robot came to the waypoint on its way there |
recoveries |
int |
Recovery behaviours Nav2 ran on the way there |
min_clearance_m |
float or None |
Nearest laser return on the way there |
Methods
result.metrics(): A flat dict of the run’s numbers (duration_s, waypoints_reached, waypoints_total, final_pos_error_m, final_yaw_error_rad, recoveries, min_clearance_m), ready to write to an Artefacts metrics.json.result.save(results_dir): Writes the result as <results_dir>/<route>_<YYYYmmdd-HHMMSS>[_<label>].yaml and returns the path.result.summary(): A one-line description of the run.
Example
import json

result = follow_route(timeout_s=300)
assert result.succeeded, result.summary()

with open("output/metrics.json", "w") as f:
    json.dump(result.metrics(), f)